
This page shows you how to orchestrate the deployment, management, and monitoring of a secure 3-node CockroachDB cluster in a single Kubernetes cluster, using the StatefulSet feature directly or via the Helm package manager for Kubernetes.
To deploy across multiple Kubernetes clusters in different geographic regions instead, see Kubernetes Multi-Cluster Deployment. Also, for details about potential performance bottlenecks to be aware of when running CockroachDB in Kubernetes and guidance on how to optimize your deployment for better performance, see CockroachDB Performance on Kubernetes.
To try CockroachDB Cloud instead of running CockroachDB yourself, refer to the Cloud Quickstart.
Before you begin
Before getting started, it's helpful to review some Kubernetes-specific terminology and current limitations.
Kubernetes terminology
| Feature | Description |
|---|---|
| node | A physical or virtual machine. In this tutorial, you'll create GCE or AWS instances and join them as worker nodes into a single Kubernetes cluster from your local workstation. |
| pod | A pod is a group of one of more Docker containers. In this tutorial, each pod will run on a separate Kubernetes node and include one Docker container running a single CockroachDB node. You'll start with 3 pods and grow to 4. |
| StatefulSet | A StatefulSet is a group of pods treated as stateful units, where each pod has distinguishable network identity and always binds back to the same persistent storage on restart. StatefulSets are considered stable as of Kubernetes version 1.9 after reaching beta in version 1.5. |
| persistent volume | A persistent volume is a piece of networked storage (Persistent Disk on GCE, Elastic Block Store on AWS) mounted into a pod. The lifetime of a persistent volume is decoupled from the lifetime of the pod that's using it, ensuring that each CockroachDB node binds back to the same storage on restart. This tutorial assumes that dynamic volume provisioning is available. When that is not the case, persistent volume claims need to be created manually. |
| RBAC | RBAC, or Role-Based Access Control, is the system Kubernetes uses to manage permissions within the cluster. In order to take an action (e.g., get or create) on an API resource (e.g., a pod), the client must have a Role that allows it to do so. This tutorial creates the RBAC resources necessary for CockroachDB to create and access certificates. |
Limitations
Kubernetes version
To deploy CockroachDB v20.2, Kubernetes 1.18 or higher is required. Cockroach Labs strongly recommends that you use a Kubernetes version that is eligible for patch support by the Kubernetes project.
Helm version
Helm 3.0 or higher is required when using our instructions to deploy via Helm.
Resources
When starting Kubernetes, select machines with at least 4 vCPUs and 16 GiB of memory, and provision at least 2 vCPUs and 8 Gi of memory to CockroachDB per pod. These minimum settings are used by default in this deployment guide, and are appropriate for testing purposes only. On a production deployment, you should adjust the resource settings for your workload.
Storage
At this time, orchestrations of CockroachDB with Kubernetes use external persistent volumes that are often replicated by the provider. Because CockroachDB already replicates data automatically, this additional layer of replication is unnecessary and can negatively impact performance. High-performance use cases on a private Kubernetes cluster may want to consider using local volumes.
Step 1. Start Kubernetes
You can use the hosted Google Kubernetes Engine (GKE) service or the hosted Amazon Elastic Kubernetes Service (EKS) to quickly start Kubernetes.
GKE or EKS are not required to run CockroachDB on Kubernetes. A manual GCE or AWS cluster with the minimum recommended Kubernetes version and at least 3 pods, each presenting sufficient resources to start a CockroachDB node, can also be used.
You can also use the CockroachDB Kubernetes Operator on platforms such as Red Hat OpenShift and IBM Cloud Pak for Data.
Hosted GKE
Complete the Before You Begin steps described in the Google Kubernetes Engine Quickstart documentation.
This includes installing
gcloud, which is used to create and delete Kubernetes Engine clusters, andkubectl, which is the command-line tool used to manage Kubernetes from your workstation.Tip:The documentation offers the choice of using Google's Cloud Shell product or using a local shell on your machine. Choose to use a local shell if you want to be able to view the DB Console using the steps in this guide.
From your local workstation, start the Kubernetes cluster, specifying one of the available regions (e.g.,
us-east1):Tip:Since this region can differ from your default
gcloudregion, be sure to include the--regionflag to rungcloudcommands against this cluster.$ gcloud container clusters create cockroachdb --machine-type n2-standard-4 --region {region-name} --num-nodes 1Creating cluster cockroachdb...done.This creates GKE instances and joins them into a single Kubernetes cluster named
cockroachdb. The--regionflag specifies a regional three-zone cluster, and--num-nodesspecifies one node in each zone.The
--machine-typeflag tells the node pool to use then2-standard-4machine type (4 vCPUs, 16 GB memory), which meets our recommended CPU and memory configuration.The process can take a few minutes, so do not move on to the next step until you see a
Creating cluster cockroachdb...donemessage and details about your cluster.Get the email address associated with your Google Cloud account:
$ gcloud info | grep AccountAccount: [your.google.cloud.email@example.org]Warning:This command returns your email address in all lowercase. However, in the next step, you must enter the address using the accurate capitalization. For example, if your address is YourName@example.com, you must use YourName@example.com and not yourname@example.com.
Create the RBAC roles CockroachDB needs for running on GKE, using the address from the previous step:
$ kubectl create clusterrolebinding $USER-cluster-admin-binding \
--clusterrole=cluster-admin \
--user=<your.google.cloud.email@example.org>
clusterrolebinding.rbac.authorization.k8s.io/your.username-cluster-admin-binding created
Hosted EKS
Complete the steps described in the EKS Getting Started documentation.
This includes installing and configuring the AWS CLI and
eksctl, which is the command-line tool used to create and delete Kubernetes clusters on EKS, andkubectl, which is the command-line tool used to manage Kubernetes from your workstation.From your local workstation, start the Kubernetes cluster:
Tip:To ensure that all 3 nodes can be placed into a different availability zone, you may want to first confirm that at least 3 zones are available in the region for your account.
$ eksctl create cluster \
--name cockroachdb \
--nodegroup-name standard-workers \
--node-type m5.xlarge \
--nodes 3 \
--nodes-min 1 \
--nodes-max 4 \
--node-ami auto
This creates EKS instances and joins them into a single Kubernetes cluster named
cockroachdb. The--node-typeflag tells the node pool to use them5.xlargeinstance type (4 vCPUs, 16 GB memory), which meets our recommended CPU and memory configuration.Cluster provisioning usually takes between 10 and 15 minutes. Do not move on to the next step until you see a message like
[✔] EKS cluster "cockroachdb" in "us-east-1" region is readyand details about your cluster.Open the AWS CloudFormation console to verify that the stacks
eksctl-cockroachdb-clusterandeksctl-cockroachdb-nodegroup-standard-workerswere successfully created. Be sure that your region is selected in the console.
Step 2. Start CockroachDB
Choose how you want to deploy and maintain the CockroachDB cluster:
- CockroachDB Kubernetes Operator (recommended)
- Helm package manager
- Manually apply our StatefulSet configuration and related files
New in v20.2: The CockroachDB Kubernetes Operator eases the creation of StatefulSets, pod authentication, cluster scaling, and rolling upgrades. The Operator is currently in beta and is not yet production-ready.
The CockroachDB Kubernetes Operator can also be run on platforms such as Red Hat OpenShift and IBM Cloud Pak for Data.
The Operator is currently supported for GKE only.
Install the Operator
Apply the CustomResourceDefinition (CRD) for the Operator:
$ kubectl apply -f https://raw.githubusercontent.com/cockroachdb/cockroach-operator/v2.18.2/install/crds.yamlcustomresourcedefinition.apiextensions.k8s.io/crdbclusters.crdb.cockroachlabs.com createdApply the Operator manifest:
$ kubectl apply -f https://raw.githubusercontent.com/cockroachdb/cockroach-operator/v2.18.2/install/operator.yamlclusterrole.rbac.authorization.k8s.io/cockroach-operator-role created serviceaccount/cockroach-operator-default created clusterrolebinding.rbac.authorization.k8s.io/cockroach-operator-default created deployment.apps/cockroach-operator createdValidate that the Operator is running:
$ kubectl get podsNAME READY STATUS RESTARTS AGE cockroach-operator-6f7b86ffc4-9ppkv 1/1 Running 0 54s
Configure the cluster
On a production cluster, you will need to modify the StatefulSet configuration with values that are appropriate for your workload.
Download and edit
example.yaml, which tells the Operator how to configure the Kubernetes cluster.$ curl -O https://raw.githubusercontent.com/cockroachdb/cockroach-operator/v2.18.2/examples/example.yaml$ vi example.yamlAllocate CPU and memory resources to CockroachDB on each pod. Enable the commented-out lines in
example.yamland substitute values that are appropriate for your workload. For more context on provisioning CPU and memory, see the Production Checklist.Tip:Resource
requestsandlimitsshould have identical values.resources: requests: cpu: "2" memory: "8Gi" limits: cpu: "2" memory: "8Gi"Note:If no resource limits are specified, the pods will be able to consume the maximum available CPUs and memory. However, to avoid overallocating resources when another memory-intensive workload is on the same instance, always set resource requests and limits explicitly.
Modify
resources.requests.storageto allocate the appropriate amount of disk storage for your workload. This configuration defaults to 60Gi of disk space per pod. For more context on provisioning storage, see the Production Checklist.resources: requests: storage: "60Gi"
Initialize the cluster
By default, the Operator will generate and sign 1 client and 1 node certificate to secure the cluster. To authenticate using your own CA, see Operate CockroachDB on Kubernetes.
Apply
example.yaml:$ kubectl apply -f example.yamlThe Operator will create a StatefulSet and initialize the nodes as a cluster.
crdbcluster.crdb.cockroachlabs.com/cockroachdb createdCheck that the pods were created:
$ kubectl get podsNAME READY STATUS RESTARTS AGE cockroach-operator-6f7b86ffc4-9t9zb 1/1 Running 0 3m22s cockroachdb-0 1/1 Running 0 2m31s cockroachdb-1 1/1 Running 1 102s cockroachdb-2 1/1 Running 0 46sEach pod should have
READYstatus soon after being created.
Set up configuration file
Download and modify our StatefulSet configuration:
$ curl -O https://raw.githubusercontent.com/cockroachdb/cockroach/master/cloud/kubernetes/bring-your-own-certs/cockroachdb-statefulset.yamlAllocate CPU and memory resources to CockroachDB on each pod. These settings should be appropriate for your workload. For more context on provisioning CPU and memory, see the Production Checklist.
Tip:Resource
requestsandlimitsshould have identical values.resources: requests: cpu: "2" memory: "8Gi" limits: cpu: "2" memory: "8Gi"Note:If no resource limits are specified, the pods will be able to consume the maximum available CPUs and memory. However, to avoid overallocating resources when another memory-intensive workload is on the same instance, always set resource requests and limits explicitly.
In the
volumeClaimTemplatesspecification, you may want to modifyresources.requests.storagefor your use case. This configuration defaults to 100Gi of disk space per pod. For more details on customizing disks for performance, see these instructions.resources: requests: storage: "100Gi"
Initialize the cluster
The below steps use cockroach cert commands to quickly generate and sign the CockroachDB node and client certificates. If you use a different method of generating certificates, make sure to update secret.secretName in the StatefulSet configuration with the name of your node secret.
Create two directories:
$ mkdir certs my-safe-directoryDirectory Description certsYou'll generate your CA certificate and all node and client certificates and keys in this directory. my-safe-directoryYou'll generate your CA key in this directory and then reference the key when generating node and client certificates. Create the CA certificate and key pair:
$ cockroach cert create-ca \
--certs-dir=certs \
--ca-key=my-safe-directory/ca.key
Create a client certificate and key pair for the root user:
$ cockroach cert create-client \
root \
--certs-dir=certs \
--ca-key=my-safe-directory/ca.key
Upload the client certificate and key to the Kubernetes cluster as a secret:
$ kubectl create secret \
generic cockroachdb.client.root \
--from-file=certs
secret/cockroachdb.client.root createdCreate the certificate and key pair for your CockroachDB nodes:
$ cockroach cert create-node \
localhost 127.0.0.1 \
cockroachdb-public \
cockroachdb-public.default \
cockroachdb-public.default.svc.cluster.local \
*.cockroachdb \
*.cockroachdb.default \
*.cockroachdb.default.svc.cluster.local \
--certs-dir=certs \
--ca-key=my-safe-directory/ca.key
Upload the node certificate and key to the Kubernetes cluster as a secret:
$ kubectl create secret \
generic cockroachdb.node \
--from-file=certs
secret/cockroachdb.node createdCheck that the secrets were created on the cluster:
$ kubectl get secretsNAME TYPE DATA AGE cockroachdb.client.root Opaque 3 41m cockroachdb.node Opaque 5 14s default-token-6qjdb kubernetes.io/service-account-token 3 4mUse the config file you downloaded to create the StatefulSet that automatically creates 3 pods, each running a CockroachDB node:
$ kubectl create -f cockroachdb-statefulset.yamlserviceaccount/cockroachdb created role.rbac.authorization.k8s.io/cockroachdb created rolebinding.rbac.authorization.k8s.io/cockroachdb created service/cockroachdb-public created service/cockroachdb created poddisruptionbudget.policy/cockroachdb-budget created statefulset.apps/cockroachdb createdInitialize the CockroachDB cluster:
Confirm that three pods are
Runningsuccessfully. Note that they will not be consideredReadyuntil after the cluster has been initialized:$ kubectl get podsNAME READY STATUS RESTARTS AGE cockroachdb-0 0/1 Running 0 2m cockroachdb-1 0/1 Running 0 2m cockroachdb-2 0/1 Running 0 2mConfirm that the persistent volumes and corresponding claims were created successfully for all three pods:
$ kubectl get pvNAME CAPACITY ACCESS MODES RECLAIM POLICY STATUS CLAIM STORAGECLASS REASON AGE pvc-9e435563-fb2e-11e9-a65c-42010a8e0fca 100Gi RWO Delete Bound default/datadir-cockroachdb-0 standard 51m pvc-9e47d820-fb2e-11e9-a65c-42010a8e0fca 100Gi RWO Delete Bound default/datadir-cockroachdb-1 standard 51m pvc-9e4f57f0-fb2e-11e9-a65c-42010a8e0fca 100Gi RWO Delete Bound default/datadir-cockroachdb-2 standard 51mRun
cockroach initon one of the pods to complete the node startup process and have them join together as a cluster:$ kubectl exec -it cockroachdb-0 \ -- /cockroach/cockroach init \ --certs-dir=/cockroach/cockroach-certsCluster successfully initializedConfirm that cluster initialization has completed successfully. The job should be considered successful and the Kubernetes pods should soon be considered
Ready:$ kubectl get podsNAME READY STATUS RESTARTS AGE cockroachdb-0 1/1 Running 0 3m cockroachdb-1 1/1 Running 0 3m cockroachdb-2 1/1 Running 0 3m
The CockroachDB Helm chart is undergoing maintenance for compatibility with Kubernetes versions 1.17 through 1.21 (the latest version as of this writing). No new feature development is currently planned. For new production and local deployments, we currently recommend using a manual configuration (Configs option). If you are experiencing issues with a Helm deployment on production, contact our Support team.
Secure CockroachDB deployments on Amazon EKS via Helm are not yet supported.
Install the Helm client (version 3.0 or higher) and add the
cockroachdbchart repository:$ helm repo add cockroachdb https://charts.cockroachdb.com/"cockroachdb" has been added to your repositoriesUpdate your Helm chart repositories to ensure that you're using the latest CockroachDB chart:
$ helm repo updateOn a production cluster, you will need to modify the StatefulSet configuration with values that are appropriate for your workload. Modify our Helm chart's
values.yamlparameters:Create a
my-values.yamlfile to override the defaults invalues.yaml, substituting your own values in this example based on the guidelines below.Tip:Resource
requestsandlimitsshould have identical values.statefulset: resources: limits: cpu: "16" memory: "8Gi" requests: cpu: "16" memory: "8Gi" conf: cache: "2Gi" max-sql-memory: "2Gi" tls: enabled: trueTo avoid running out of memory when CockroachDB is not the only pod on a Kubernetes node, you must set memory limits explicitly. This is because CockroachDB does not detect the amount of memory allocated to its pod when run in Kubernetes. We recommend setting
conf.cacheandconf.max-sql-memoryeach to 1/4 of thememoryallocation specified instatefulset.resources.requestsandstatefulset.resources.limits.Tip:For example, if you are allocating 8Gi of
memoryto each CockroachDB node, allocate 2Gi tocacheand 2Gi tomax-sql-memory.You may want to modify
storage.persistentVolume.sizeandstorage.persistentVolume.storageClassfor your use case. This chart defaults to 100Gi of disk space per pod. For more details on customizing disks for performance, see these instructions.For a secure deployment, set
tls.enabledto true.
Install the CockroachDB Helm chart.
Provide a "release" name to identify and track this particular deployment of the chart, and override the default values with those in
my-values.yaml.Note:This tutorial uses
my-releaseas the release name. If you use a different value, be sure to adjust the release name in subsequent commands.$ helm install my-release --values my-values.yaml cockroachdb/cockroachdbBehind the scenes, this command uses our
cockroachdb-statefulset.yamlfile to create the StatefulSet that automatically creates 3 pods, each with a CockroachDB node running inside it, where each pod has distinguishable network identity and always binds back to the same persistent storage on restart.As each pod is created, it issues a Certificate Signing Request, or CSR, to have the CockroachDB node's certificate signed by the Kubernetes CA. You must manually check and approve each node's certificate, at which point the CockroachDB node is started in the pod.
Get the names of the
PendingCSRs:$ kubectl get csrNAME AGE REQUESTOR CONDITION default.client.root 21s system:serviceaccount:default:my-release-cockroachdb Pending default.node.my-release-cockroachdb-0 15s system:serviceaccount:default:my-release-cockroachdb Pending default.node.my-release-cockroachdb-1 16s system:serviceaccount:default:my-release-cockroachdb Pending default.node.my-release-cockroachdb-2 15s system:serviceaccount:default:my-release-cockroachdb Pending ...If you do not see a
PendingCSR, wait a minute and try again.Examine the CSR for the first pod:
$ kubectl describe csr default.node.my-release-cockroachdb-0Name: default.node.my-release-cockroachdb-0 Labels: <none> Annotations: <none> CreationTimestamp: Mon, 10 Dec 2018 05:36:35 -0500 Requesting User: system:serviceaccount:default:my-release-cockroachdb Status: Pending Subject: Common Name: node Serial Number: Organization: Cockroach Subject Alternative Names: DNS Names: localhost my-release-cockroachdb-0.my-release-cockroachdb.default.svc.cluster.local my-release-cockroachdb-0.my-release-cockroachdb my-release-cockroachdb-public my-release-cockroachdb-public.default.svc.cluster.local IP Addresses: 127.0.0.1 Events: <none>If everything looks correct, approve the CSR for the first pod:
$ kubectl certificate approve default.node.my-release-cockroachdb-0certificatesigningrequest.certificates.k8s.io/default.node.my-release-cockroachdb-0 approvedRepeat steps 2 and 3 for the other 2 pods.
Confirm that three pods are
Runningsuccessfully:$ kubectl get podsNAME READY STATUS RESTARTS AGE my-release-cockroachdb-0 0/1 Running 0 6m my-release-cockroachdb-1 0/1 Running 0 6m my-release-cockroachdb-2 0/1 Running 0 6m my-release-cockroachdb-init-hxzsc 0/1 Init:0/1 0 6mApprove the CSR for the one-off pod from which cluster initialization happens:
$ kubectl certificate approve default.client.rootcertificatesigningrequest.certificates.k8s.io/default.client.root approvedConfirm that CockroachDB cluster initialization has completed successfully, with the pods for CockroachDB showing
1/1underREADYand the pod for initialization showingCOMPLETEDunderSTATUS:$ kubectl get podsNAME READY STATUS RESTARTS AGE my-release-cockroachdb-0 1/1 Running 0 8m my-release-cockroachdb-1 1/1 Running 0 8m my-release-cockroachdb-2 1/1 Running 0 8m my-release-cockroachdb-init-hxzsc 0/1 Completed 0 1hConfirm that the persistent volumes and corresponding claims were created successfully for all three pods:
$ kubectl get pvNAME CAPACITY ACCESS MODES RECLAIM POLICY STATUS CLAIM STORAGECLASS REASON AGE pvc-71019b3a-fc67-11e8-a606-080027ba45e5 100Gi RWO Delete Bound default/datadir-my-release-cockroachdb-0 standard 11m pvc-7108e172-fc67-11e8-a606-080027ba45e5 100Gi RWO Delete Bound default/datadir-my-release-cockroachdb-1 standard 11m pvc-710dcb66-fc67-11e8-a606-080027ba45e5 100Gi RWO Delete Bound default/datadir-my-release-cockroachdb-2 standard 11m
The StatefulSet configuration sets all CockroachDB nodes to log to stderr, so if you ever need access to a pod/node's logs to troubleshoot, use kubectl logs <podname> rather than checking the log on the persistent volume.
Step 3. Use the built-in SQL client
Get a shell into one of the pods and start the CockroachDB built-in SQL client:
$ kubectl exec -it cockroachdb-2 \
-- ./cockroach sql \
--certs-dir cockroach-certs
# Welcome to the CockroachDB SQL shell. # All statements must be terminated by a semicolon. # To exit, type: \q. # # Server version: CockroachDB CCL v20.2.0 (x86_64-unknown-linux-gnu, built 2020/07/29 22:56:36, go1.13.9) (same version as client) # Cluster ID: f82abd88-5d44-4493-9558-d6c75a3b80cc # # Enter \? for a brief introduction. # root@:26257/defaultdb>Run some basic CockroachDB SQL statements:
> CREATE DATABASE bank;> CREATE TABLE bank.accounts (id INT PRIMARY KEY, balance DECIMAL);> INSERT INTO bank.accounts VALUES (1, 1000.50);> SELECT * FROM bank.accounts;id | balance +----+---------+ 1 | 1000.50 (1 row)Create a user with a password:
> CREATE USER roach WITH PASSWORD 'Q7gc8rEdS';You will need this username and password to access the DB Console later.
Exit the SQL shell and pod:
> \q
To use the built-in SQL client, you need to launch a pod that runs indefinitely with the cockroach binary inside it, get a shell into the pod, and then start the built-in SQL client.
~~~ shell $ kubectl create \ -f https://raw.githubusercontent.com/cockroachdb/cockroach/master/cloud/kubernetes/bring-your-own-certs/client.yaml ~~~
~~~ pod/cockroachdb-client-secure created ~~~
Get a shell into the pod and start the CockroachDB built-in SQL client:
$ kubectl exec -it cockroachdb-client-secure \
-- ./cockroach sql \
--certs-dir=/cockroach-certs \
--host=cockroachdb-public
# Welcome to the CockroachDB SQL shell. # All statements must be terminated by a semicolon. # To exit, type: \q. # # Server version: CockroachDB CCL v20.2.0 (x86_64-unknown-linux-gnu, built 2020/07/29 22:56:36, go1.13.9) (same version as client) # Cluster ID: f82abd88-5d44-4493-9558-d6c75a3b80cc # # Enter \? for a brief introduction. # root@:26257/defaultdb>Tip:This pod will continue running indefinitely, so any time you need to reopen the built-in SQL client or run any other
cockroachclient commands (e.g.,cockroach node), repeat step 2 using the appropriatecockroachcommand.If you'd prefer to delete the pod and recreate it when needed, run
kubectl delete pod cockroachdb-client-secure.Run some basic CockroachDB SQL statements:
> CREATE DATABASE bank;> CREATE TABLE bank.accounts (id INT PRIMARY KEY, balance DECIMAL);> INSERT INTO bank.accounts VALUES (1, 1000.50);> SELECT * FROM bank.accounts;id | balance +----+---------+ 1 | 1000.50 (1 row)Create a user with a password:
> CREATE USER roach WITH PASSWORD 'Q7gc8rEdS';You will need this username and password to access the DB Console later.
Exit the SQL shell and pod:
> \q
To use the built-in SQL client, you need to launch a pod that runs indefinitely with the cockroach binary inside it, get a shell into the pod, and then start the built-in SQL client.
From your local workstation, use our
client-secure.yamlfile to launch a pod and keep it running indefinitely.Download the file:
$ curl -OOOOOOOOO \
https://raw.githubusercontent.com/cockroachdb/cockroach/master/cloud/kubernetes/client-secure.yaml
In the file, change
serviceAccountName: cockroachdbtoserviceAccountName: my-release-cockroachdb.Use the file to launch a pod and keep it running indefinitely:
$ kubectl create -f client-secure.yamlpod "cockroachdb-client-secure" created
Get a shell into the pod and start the CockroachDB built-in SQL client:
$ kubectl exec -it cockroachdb-client-secure \
-- ./cockroach sql \
--certs-dir=/cockroach-certs \
--host=my-release-cockroachdb-public
# Welcome to the CockroachDB SQL shell. # All statements must be terminated by a semicolon. # To exit, type: \q. # # Server version: CockroachDB CCL v20.2.0 (x86_64-unknown-linux-gnu, built 2020/07/29 22:56:36, go1.13.9) (same version as client) # Cluster ID: f82abd88-5d44-4493-9558-d6c75a3b80cc # # Enter \? for a brief introduction. # root@:26257/defaultdb>Tip:This pod will continue running indefinitely, so any time you need to reopen the built-in SQL client or run any other
cockroachclient commands (e.g.,cockroach node), repeat step 2 using the appropriatecockroachcommand.If you'd prefer to delete the pod and recreate it when needed, run
kubectl delete pod cockroachdb-client-secure.Run some basic CockroachDB SQL statements:
> CREATE DATABASE bank;> CREATE TABLE bank.accounts (id INT PRIMARY KEY, balance DECIMAL);> INSERT INTO bank.accounts VALUES (1, 1000.50);> SELECT * FROM bank.accounts;id | balance +----+---------+ 1 | 1000.50 (1 row)Create a user with a password:
> CREATE USER roach WITH PASSWORD 'Q7gc8rEdS';You will need this username and password to access the DB Console later.
Exit the SQL shell and pod:
> \q
Step 4. Access the DB Console
To access the cluster's DB Console:
On secure clusters, certain pages of the DB Console can only be accessed by
adminusers.Get a shell into the pod and start the CockroachDB built-in SQL client:
$ kubectl exec -it cockroachdb-2 \ -- ./cockroach sql \ --certs-dir cockroach-certs$ kubectl exec -it cockroachdb-client-secure \ -- ./cockroach sql \ --certs-dir=/cockroach-certs \ --host=cockroachdb-public$ kubectl exec -it cockroachdb-client-secure \ -- ./cockroach sql \ --certs-dir=/cockroach-certs \ --host=my-release-cockroachdb-public
Assign
roachto theadminrole (you only need to do this once):> GRANT admin TO roach;Exit the SQL shell and pod:
> \qIn a new terminal window, port-forward from your local machine to the
cockroachdb-publicservice:$ kubectl port-forward service/cockroachdb-public 8080$ kubectl port-forward service/cockroachdb-public 8080$ kubectl port-forward service/my-release-cockroachdb-public 8080Forwarding from 127.0.0.1:8080 -> 8080Note:Theport-forwardcommand must be run on the same machine as the web browser in which you want to view the DB Console. If you have been running these commands from a cloud instance or other non-local shell, you will not be able to view the UI without configuringkubectllocally and running the aboveport-forwardcommand on your local machine.Go to https://localhost:8080 and log in with the username and password you created earlier.
Note:If you are using Google Chrome, and you are getting an error about not being able to reach
localhostbecause its certificate has been revoked, go to chrome://flags/#allow-insecure-localhost, enable "Allow invalid certificates for resources loaded from localhost", and then restart the browser. Enabling this Chrome feature degrades security for all sites running onlocalhost, not just CockroachDB's DB Console, so be sure to enable the feature only temporarily.In the UI, verify that the cluster is running as expected:
- View the Node List to ensure that all nodes successfully joined the cluster.
- Click the Databases tab on the left to verify that
bankis listed.
Step 5. Simulate node failure
Based on the replicas: 3 line in the StatefulSet configuration, Kubernetes ensures that three pods/nodes are running at all times. When a pod/node fails, Kubernetes automatically creates another pod/node with the same network identity and persistent storage.
To see this in action:
Terminate one of the CockroachDB nodes:
$ kubectl delete pod cockroachdb-2pod "cockroachdb-2" deleted$ kubectl delete pod cockroachdb-2pod "cockroachdb-2" deleted$ kubectl delete pod my-release-cockroachdb-2pod "my-release-cockroachdb-2" deletedIn the DB Console, the Cluster Overview will soon show one node as Suspect. As Kubernetes auto-restarts the node, watch how the node once again becomes healthy.
Back in the terminal, verify that the pod was automatically restarted:
$ kubectl get pod cockroachdb-2NAME READY STATUS RESTARTS AGE cockroachdb-2 1/1 Running 0 12s$ kubectl get pod cockroachdb-2NAME READY STATUS RESTARTS AGE cockroachdb-2 1/1 Running 0 12s$ kubectl get pod my-release-cockroachdb-2NAME READY STATUS RESTARTS AGE my-release-cockroachdb-2 1/1 Running 0 44s
Step 6. Monitor the cluster
Despite CockroachDB's various built-in safeguards against failure, it is critical to actively monitor the overall health and performance of a cluster running in production and to create alerting rules that promptly send notifications when there are events that require investigation or intervention.
Configure Prometheus
Every node of a CockroachDB cluster exports granular timeseries metrics formatted for easy integration with Prometheus, an open source tool for storing, aggregating, and querying timeseries data. This section shows you how to orchestrate Prometheus as part of your Kubernetes cluster and pull these metrics into Prometheus for external monitoring.
This guidance is based on CoreOS's Prometheus Operator, which allows a Prometheus instance to be managed using built-in Kubernetes concepts.
If you're on Hosted GKE, before starting, make sure the email address associated with your Google Cloud account is part of the cluster-admin RBAC group, as shown in Step 1. Start Kubernetes.
From your local workstation, edit the
cockroachdbservice to add theprometheus: cockroachdblabel:$ kubectl label svc cockroachdb prometheus=cockroachdbservice/cockroachdb labeledThis ensures that only the
cockroachdb(not thecockroach-publicservice) is being monitored by a Prometheus job.$ kubectl label svc cockroachdb prometheus=cockroachdbservice/cockroachdb labeledThis ensures that only the
cockroachdb(not thecockroach-publicservice) is being monitored by a Prometheus job.$ kubectl label svc my-release-cockroachdb prometheus=cockroachdbservice/my-release-cockroachdb labeledThis ensures that there is a Prometheus job and monitoring data only for the
my-release-cockroachdbservice, not for themy-release-cockroach-publicservice.Install CoreOS's Prometheus Operator:
Note:If you run into an error when installing the Prometheus Operator, first try updating the release version specified in the below command and reapplying the manifest. If this doesn't work, please file an issue.
$ kubectl apply \
-f https://raw.githubusercontent.com/prometheus-operator/prometheus-operator/release-0.43/bundle.yaml
customresourcedefinition.apiextensions.k8s.io/alertmanagers.monitoring.coreos.com created customresourcedefinition.apiextensions.k8s.io/podmonitors.monitoring.coreos.com created customresourcedefinition.apiextensions.k8s.io/probes.monitoring.coreos.com created customresourcedefinition.apiextensions.k8s.io/prometheuses.monitoring.coreos.com created customresourcedefinition.apiextensions.k8s.io/prometheusrules.monitoring.coreos.com created customresourcedefinition.apiextensions.k8s.io/servicemonitors.monitoring.coreos.com created customresourcedefinition.apiextensions.k8s.io/thanosrulers.monitoring.coreos.com created clusterrolebinding.rbac.authorization.k8s.io/prometheus-operator configured clusterrole.rbac.authorization.k8s.io/prometheus-operator configured deployment.apps/prometheus-operator created serviceaccount/prometheus-operator configured service/prometheus-operator createdConfirm that the
prometheus-operatorhas started:$ kubectl get deploy prometheus-operatorNAME READY UP-TO-DATE AVAILABLE AGE prometheus-operator 1/1 1 1 27sUse our
prometheus.yamlfile to create the various objects necessary to run a Prometheus instance:Note:By default, this manifest uses the secret name generated by the CockroachDB Kubernetes Operator. If you generated your own certificates and keys when starting CockroachDB, be sure that
ca.secret.namematches the name of the node secret you created.$ kubectl apply \ -f https://raw.githubusercontent.com/cockroachdb/cockroach/master/cloud/kubernetes/prometheus/prometheus.yamlserviceaccount/prometheus created clusterrole.rbac.authorization.k8s.io/prometheus created clusterrolebinding.rbac.authorization.k8s.io/prometheus created servicemonitor.monitoring.coreos.com/cockroachdb created prometheus.monitoring.coreos.com/cockroachdb createdAccess the Prometheus UI locally and verify that CockroachDB is feeding data into Prometheus:
Port-forward from your local machine to the pod running Prometheus:
$ kubectl port-forward prometheus-cockroachdb-0 9090Go to http://localhost:9090 in your browser.
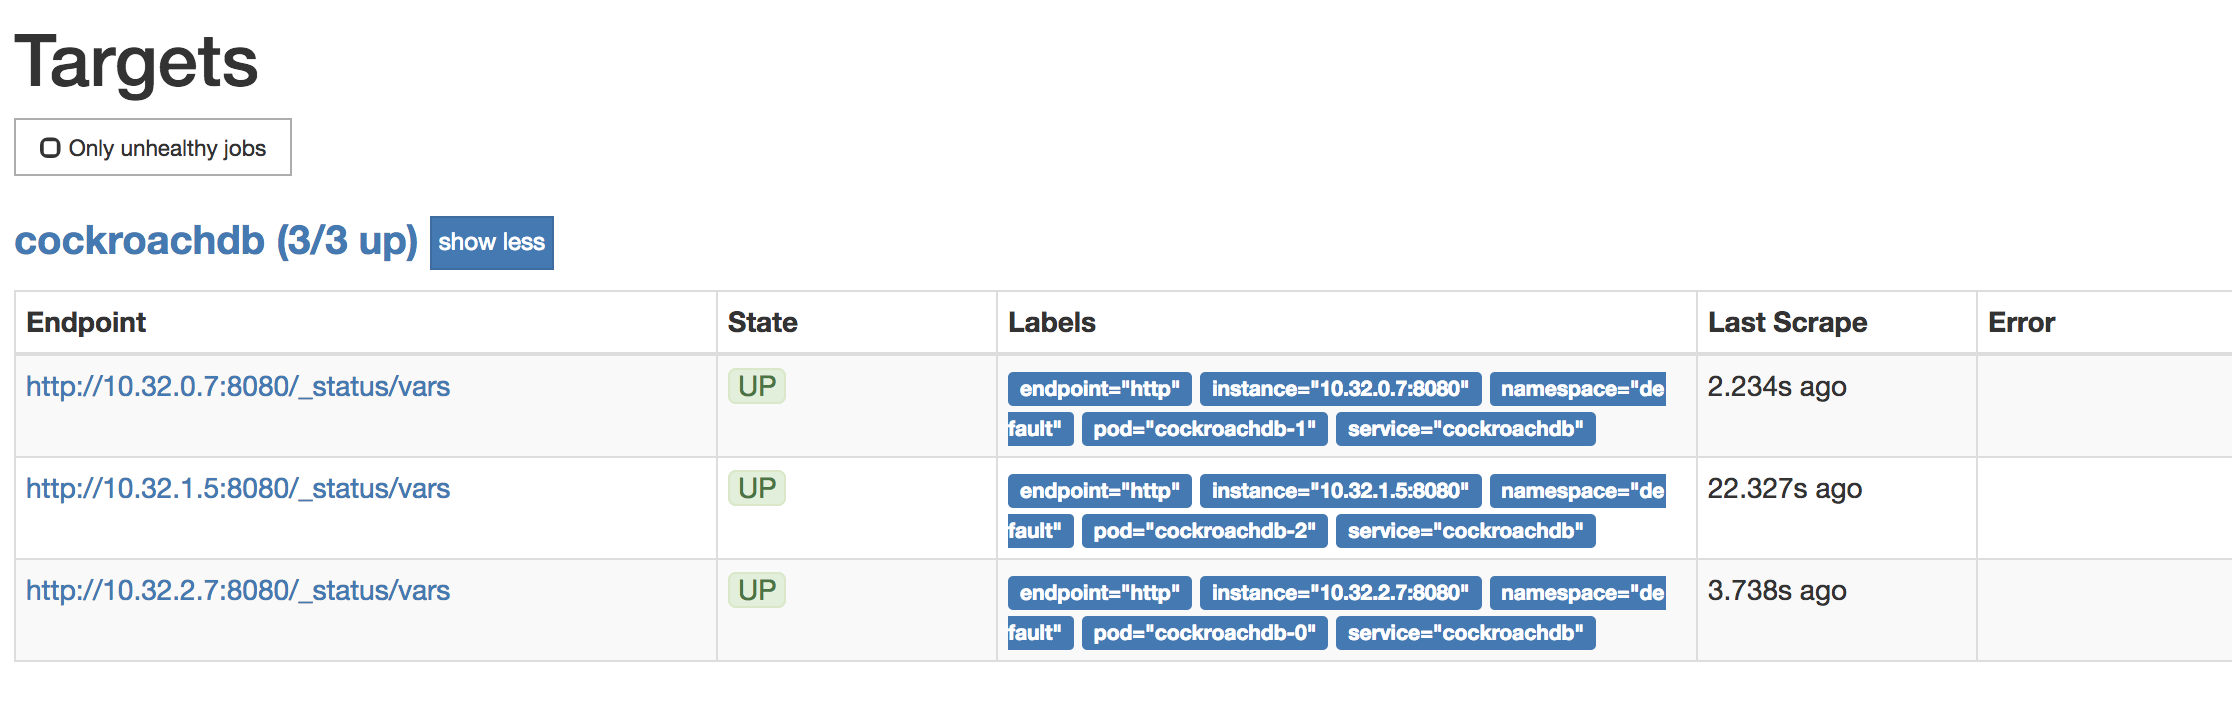
To verify that each CockroachDB node is connected to Prometheus, go to Status > Targets. The screen should look like this:
To verify that data is being collected, go to Graph, enter the
sys_uptimevariable in the field, click Execute, and then click the Graph tab. The screen should like this: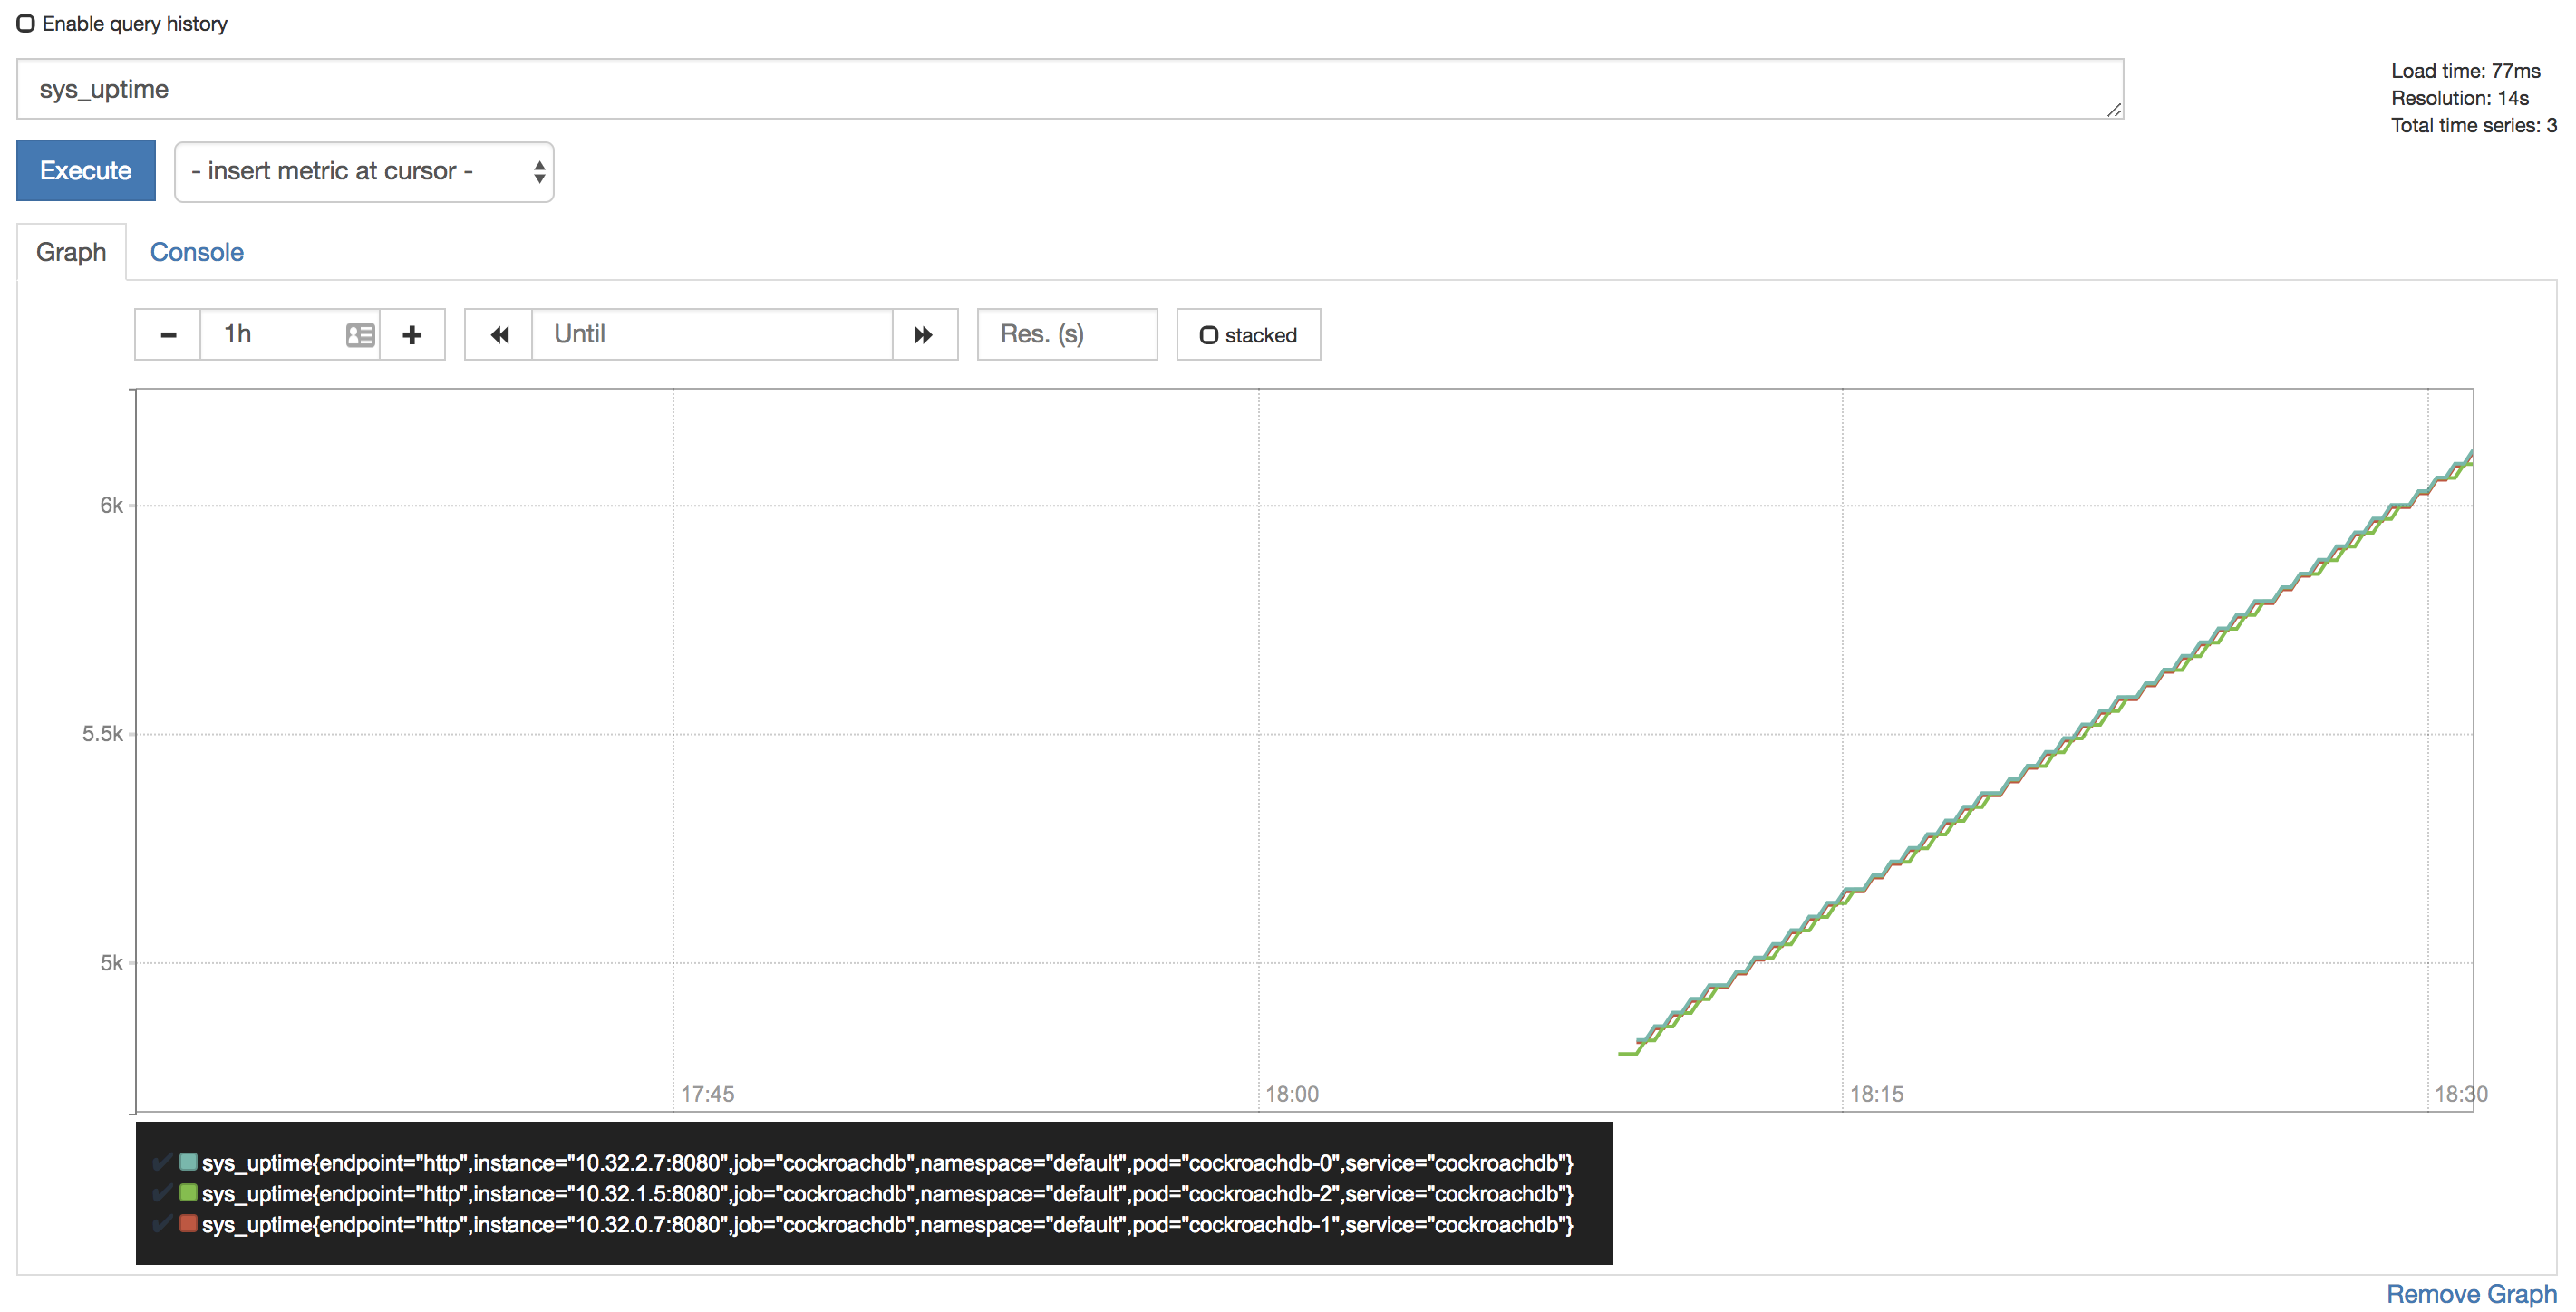
Tip:Prometheus auto-completes CockroachDB time series metrics for you, but if you want to see a full listing, with descriptions, port-forward as described in Access the DB Console and then point your browser to http://localhost:8080/_status/vars.
For more details on using the Prometheus UI, see their official documentation.
Configure Alertmanager
Active monitoring helps you spot problems early, but it is also essential to send notifications when there are events that require investigation or intervention. This section shows you how to use Alertmanager and CockroachDB's starter alerting rules to do this.
Download our
alertmanager-config.yamlconfiguration file:$ curl -OOOOOOOOO \ https://raw.githubusercontent.com/cockroachdb/cockroach/master/cloud/kubernetes/prometheus/alertmanager-config.yamlEdit the
alertmanager-config.yamlfile to specify the desired receivers for notifications. Initially, the file contains a placeholder web hook.Add this configuration to the Kubernetes cluster as a secret, renaming it to
alertmanager.yamland labelling it to make it easier to find:$ kubectl create secret generic alertmanager-cockroachdb \ --from-file=alertmanager.yaml=alertmanager-config.yamlsecret/alertmanager-cockroachdb created$ kubectl label secret alertmanager-cockroachdb app=cockroachdbsecret/alertmanager-cockroachdb labeledWarning:The name of the secret,
alertmanager-cockroachdb, must match the name used in thealertmanager.yamlfile. If they differ, the Alertmanager instance will start without configuration, and nothing will happen.Use our
alertmanager.yamlfile to create the various objects necessary to run an Alertmanager instance, including a ClusterIP service so that Prometheus can forward alerts:$ kubectl apply \ -f https://raw.githubusercontent.com/cockroachdb/cockroach/master/cloud/kubernetes/prometheus/alertmanager.yamlalertmanager.monitoring.coreos.com/cockroachdb created service/alertmanager-cockroachdb createdVerify that Alertmanager is running:
Port-forward from your local machine to the pod running Alertmanager:
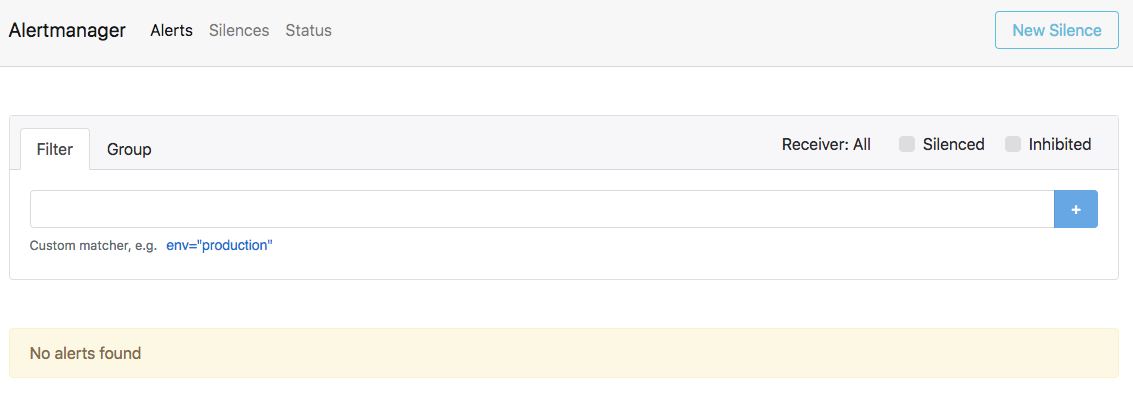
$ kubectl port-forward alertmanager-cockroachdb-0 9093Go to http://localhost:9093 in your browser. The screen should look like this:
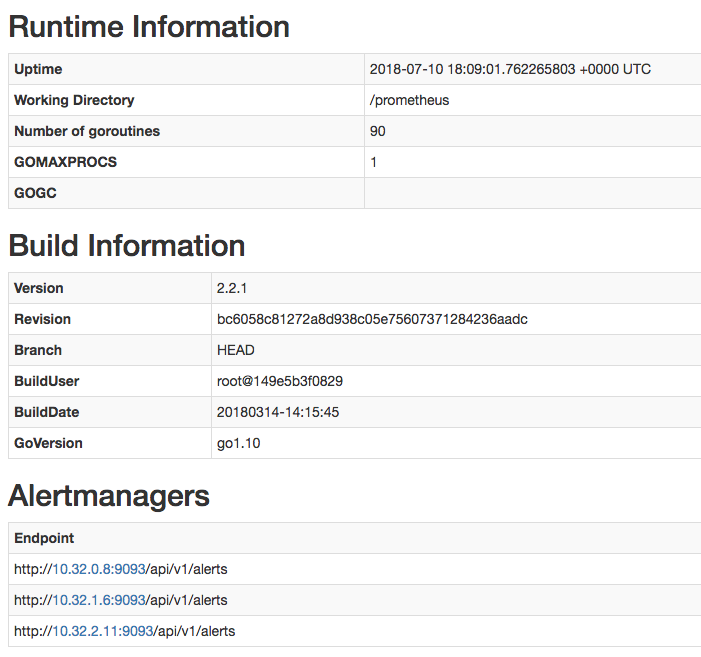
Ensure that the Alertmanagers are visible to Prometheus by opening http://localhost:9090/status. The screen should look like this:
Add CockroachDB's starter alerting rules:
$ kubectl apply \
-f https://raw.githubusercontent.com/cockroachdb/cockroach/master/cloud/kubernetes/prometheus/alert-rules.yaml
prometheusrule.monitoring.coreos.com/prometheus-cockroachdb-rules createdEnsure that the rules are visible to Prometheus by opening http://localhost:9090/rules. The screen should look like this:
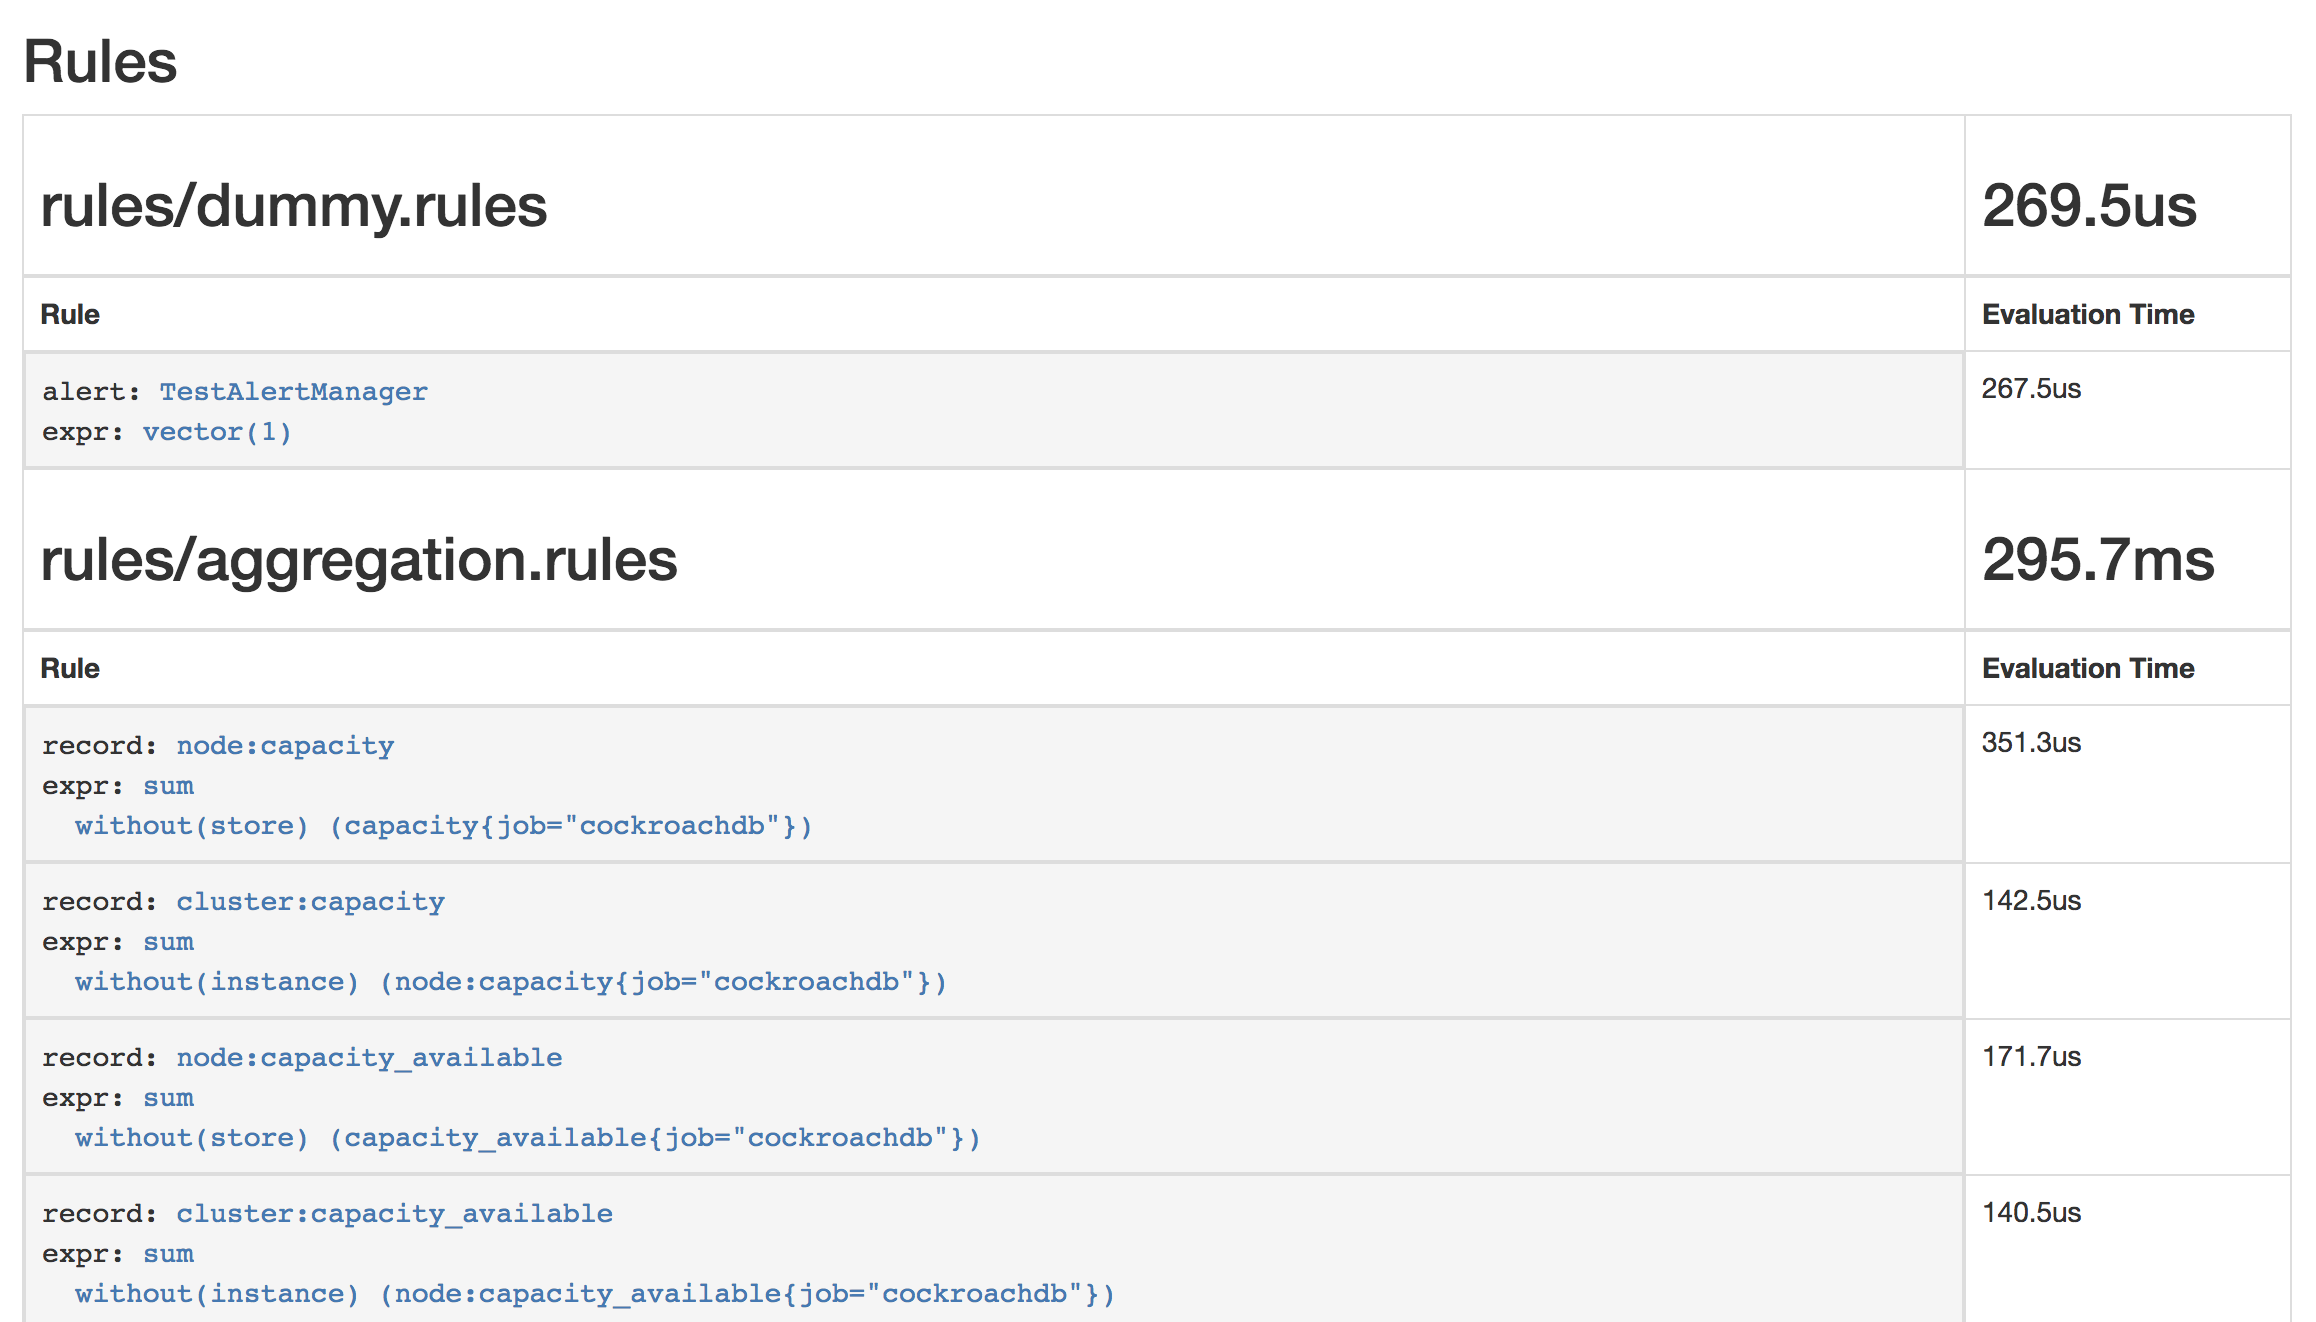
Verify that the
TestAlertManagerexample alert is firing by opening http://localhost:9090/alerts. The screen should look like this: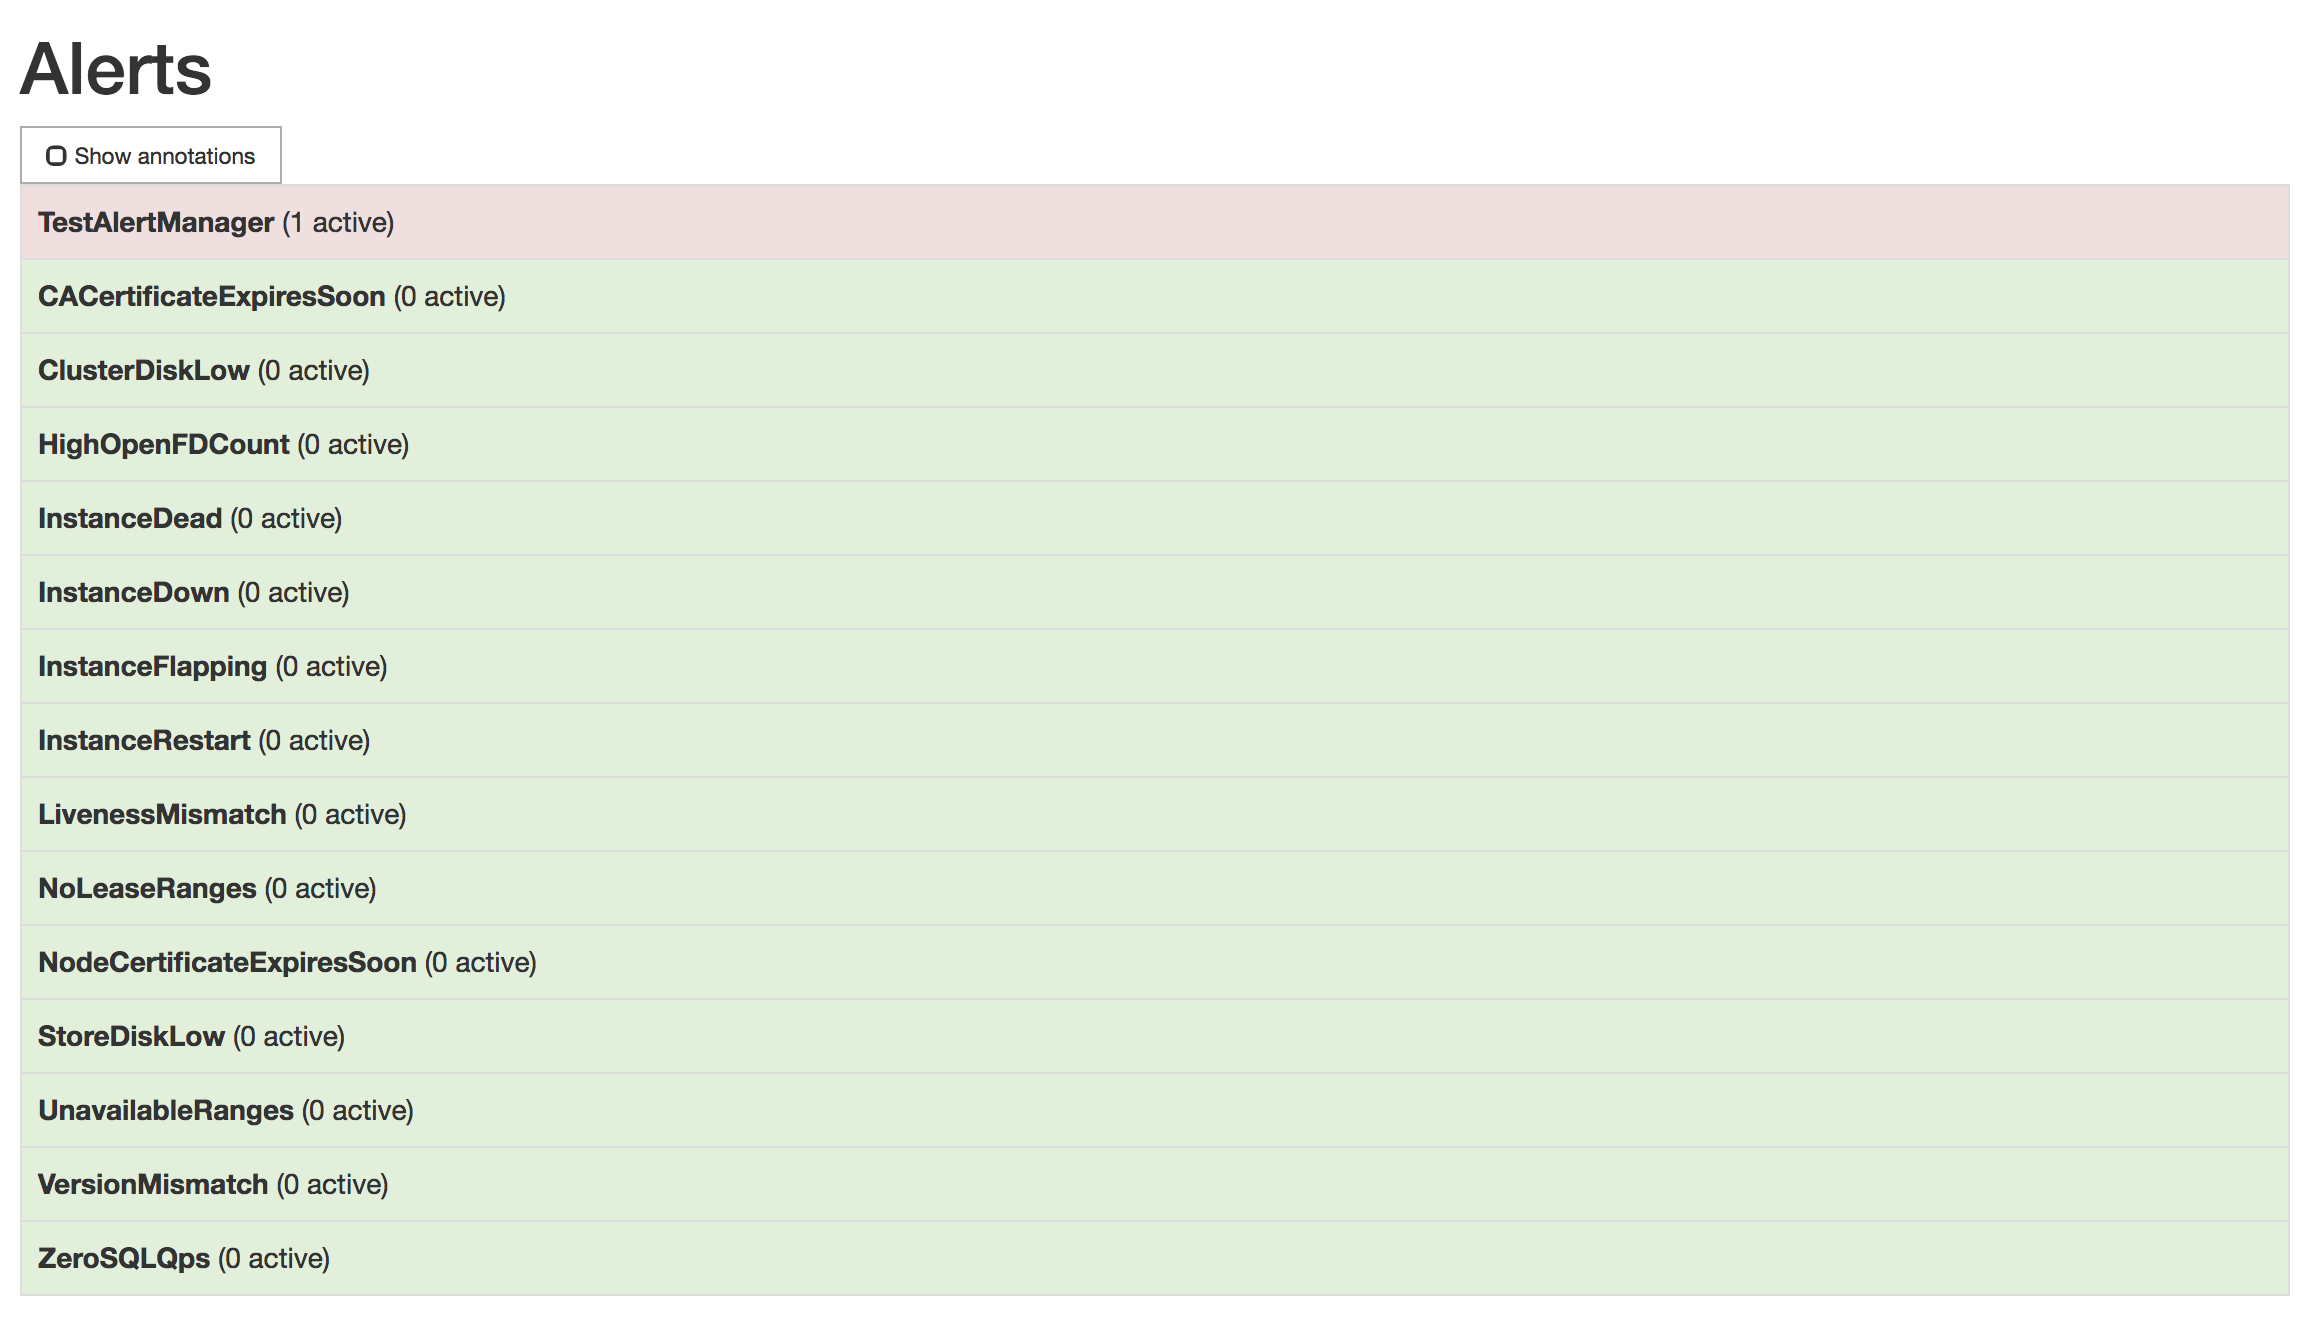
To remove the example alert:
Use the
kubectl editcommand to open the rules for editing:$ kubectl edit prometheusrules prometheus-cockroachdb-rulesRemove the
dummy.rulesblock and save the file:- name: rules/dummy.rules rules: - alert: TestAlertManager expr: vector(1)
Step 7. Maintain the cluster
Add nodes
Your Kubernetes cluster includes 3 worker nodes, or instances, that can run pods. A CockroachDB node runs in each pod. As recommended in our production best practices, you should ensure that two pods are not placed on the same worker node.
Open and edit
example.yaml.$ vi example.yamlIn
example.yaml, update the number ofnodes:nodes: 4Note:Note that you must scale by updating the
nodesvalue in the Operator configuration. Usingkubectl scale statefulset <cluster-name> --replicas=4will result in new pods immediately being terminated.Apply
example.yamlwith the new configuration:$ kubectl apply -f example.yamlVerify that the new pod started successfully:
$ kubectl get podsNAME READY STATUS RESTARTS AGE cockroachdb-0 1/1 Running 0 51m cockroachdb-1 1/1 Running 0 47m cockroachdb-2 1/1 Running 0 3m cockroachdb-3 1/1 Running 0 1m ...Back in the DB Console, view the Node List to ensure that the fourth node successfully joined the cluster.
On a production deployment, first add a worker node, bringing the total from 3 to 4:
- On GKE, resize your cluster.
- On EKS, resize your Worker Node Group.
- On GCE, resize your Managed Instance Group.
- On AWS, resize your Auto Scaling Group.
Edit your StatefulSet configuration to add another pod for the new CockroachDB node:
$ kubectl scale statefulset cockroachdb --replicas=4statefulset.apps/cockroachdb scaledVerify that the new pod started successfully:
$ kubectl get podsNAME READY STATUS RESTARTS AGE cockroachdb-0 1/1 Running 0 51m cockroachdb-1 1/1 Running 0 47m cockroachdb-2 1/1 Running 0 3m cockroachdb-3 1/1 Running 0 1m cockroachdb-client-secure 1/1 Running 0 15m ...Back in the DB Console, view the Node List to ensure that the fourth node successfully joined the cluster.
Edit your StatefulSet configuration to add another pod for the new CockroachDB node:
$ helm upgrade \
my-release \
cockroachdb/cockroachdb \
--set statefulset.replicas=4 \
--reuse-values
Release "my-release" has been upgraded. Happy Helming! LAST DEPLOYED: Tue May 14 14:06:43 2019 NAMESPACE: default STATUS: DEPLOYED RESOURCES: ==> v1beta1/PodDisruptionBudget NAME AGE my-release-cockroachdb-budget 51m ==> v1/Pod(related) NAME READY STATUS RESTARTS AGE my-release-cockroachdb-0 1/1 Running 0 38m my-release-cockroachdb-1 1/1 Running 0 39m my-release-cockroachdb-2 1/1 Running 0 39m my-release-cockroachdb-3 0/1 Pending 0 0s my-release-cockroachdb-init-nwjkh 0/1 Completed 0 39m ...Get the name of the
PendingCSR for the new pod:$ kubectl get csrNAME AGE REQUESTOR CONDITION default.client.root 1h system:serviceaccount:default:default Approved,Issued default.node.my-release-cockroachdb-0 1h system:serviceaccount:default:default Approved,Issued default.node.my-release-cockroachdb-1 1h system:serviceaccount:default:default Approved,Issued default.node.my-release-cockroachdb-2 1h system:serviceaccount:default:default Approved,Issued default.node.my-release-cockroachdb-3 2m system:serviceaccount:default:default Pending node-csr-0Xmb4UTVAWMEnUeGbW4KX1oL4XV_LADpkwjrPtQjlZ4 1h kubelet Approved,Issued node-csr-NiN8oDsLhxn0uwLTWa0RWpMUgJYnwcFxB984mwjjYsY 1h kubelet Approved,Issued node-csr-aU78SxyU69pDK57aj6txnevr7X-8M3XgX9mTK0Hso6o 1h kubelet Approved,Issued ...If you do not see a
PendingCSR, wait a minute and try again.Examine the CSR for the new pod:
$ kubectl describe csr default.node.my-release-cockroachdb-3Name: default.node.my-release-cockroachdb-3 Labels: <none> Annotations: <none> CreationTimestamp: Thu, 09 Nov 2017 13:39:37 -0500 Requesting User: system:serviceaccount:default:default Status: Pending Subject: Common Name: node Serial Number: Organization: Cockroach Subject Alternative Names: DNS Names: localhost my-release-cockroachdb-1.my-release-cockroachdb.default.svc.cluster.local my-release-cockroachdb-1.my-release-cockroachdb my-release-cockroachdb-public my-release-cockroachdb-public.default.svc.cluster.local IP Addresses: 127.0.0.1 10.48.1.6 Events: <none>If everything looks correct, approve the CSR for the new pod:
$ kubectl certificate approve default.node.my-release-cockroachdb-3certificatesigningrequest.certificates.k8s.io/default.node.my-release-cockroachdb-3 approvedVerify that the new pod started successfully:
$ kubectl get podsNAME READY STATUS RESTARTS AGE my-release-cockroachdb-0 1/1 Running 0 51m my-release-cockroachdb-1 1/1 Running 0 47m my-release-cockroachdb-2 1/1 Running 0 3m my-release-cockroachdb-3 1/1 Running 0 1m cockroachdb-client-secure 1/1 Running 0 15m ...Back in the DB Console, view the Node List to ensure that the fourth node successfully joined the cluster.
Remove nodes
Before removing a node from your cluster, you must first decommission the node. This lets a node finish in-flight requests, rejects any new requests, and transfers all range replicas and range leases off the node.
If you remove nodes without first telling CockroachDB to decommission them, you may cause data or even cluster unavailability. For more details about how this works and what to consider before removing nodes, see Decommission Nodes.
Do not scale down to fewer than 3 nodes. This is considered an anti-pattern on CockroachDB and will cause errors.
Get a shell into one of the pods and use the
cockroach node statuscommand to get the internal IDs of nodes:$ kubectl exec -it cockroachdb-2 \ -- ./cockroach node status \ --certs-dir cockroach-certsid | address | sql_address | build | started_at | updated_at | locality | is_available | is_live -----+-----------------------------------------+-----------------------------------------+---------+----------------------------------+----------------------------------+----------+--------------+---------- 1 | cockroachdb-0.cockroachdb.default:26257 | cockroachdb-0.cockroachdb.default:26257 | v20.1.4 | 2020-10-22 23:02:10.084425+00:00 | 2020-10-27 20:18:22.117115+00:00 | | true | true 2 | cockroachdb-1.cockroachdb.default:26257 | cockroachdb-1.cockroachdb.default:26257 | v20.1.4 | 2020-10-22 23:02:46.533911+00:00 | 2020-10-27 20:18:22.558333+00:00 | | true | true 3 | cockroachdb-2.cockroachdb.default:26257 | cockroachdb-2.cockroachdb.default:26257 | v20.1.4 | 2020-10-26 21:46:38.90803+00:00 | 2020-10-27 20:18:22.601021+00:00 | | true | true 4 | cockroachdb-3.cockroachdb.default:26257 | cockroachdb-3.cockroachdb.default:26257 | v20.1.4 | 2020-10-27 19:54:04.714241+00:00 | 2020-10-27 20:18:22.74559+00:00 | | true | true (4 rows)Use the
cockroach node decommissioncommand to decommission the node with the highest number in its address (in this case, the address includingcockroachdb-3):Note:It's important to decommission the node with the highest number in its address because, when you reduce the replica count, Kubernetes will remove the pod for that node.
$ kubectl exec -it cockroachdb-3 \
-- ./cockroach node decommission \
--self \
--certs-dir cockroach-certs \
--host=<address of node to decommission>
You'll then see the decommissioning status print to
stderras it changes:id | is_live | replicas | is_decommissioning | is_draining +---+---------+----------+--------------------+-------------+ 4 | true | 73 | true | false (1 row)Once the node has been fully decommissioned and stopped, you'll see a confirmation:
 id | is_live | replicas | is_decommissioning | is_draining
+---+---------+----------+--------------------+-------------+
  4 |  true   |        0 |        true        |    false
(1 row)

No more data reported on target nodes. Please verify cluster health before removing the nodes.
Once the node has been decommissioned, open and edit
example.yaml.$ vi example.yamlIn
example.yaml, update the number ofnodes:nodes: 3Apply
example.yamlwith the new configuration:$ kubectl apply -f example.yamlThe Operator will remove the node with the highest number in its address (in this case, the address including
cockroachdb-3) from the cluster. It will also remove the persistent volume that was mounted to the pod.Verify that the pod was successfully removed:
$ kubectl get podsNAME READY STATUS RESTARTS AGE cockroachdb-0 1/1 Running 0 51m cockroachdb-1 1/1 Running 0 47m cockroachdb-2 1/1 Running 0 3m ...
Get a shell into the
cockroachdb-client-securepod you created earlier and use thecockroach node statuscommand to get the internal IDs of nodes:$ kubectl exec -it cockroachdb-client-secure \ -- ./cockroach node status \ --certs-dir=/cockroach-certs \ --host=cockroachdb-publicid | address | build | started_at | updated_at | is_available | is_live +----+---------------------------------------------------------------------------------+--------+----------------------------------+----------------------------------+--------------+---------+ 1 | cockroachdb-0.cockroachdb.default.svc.cluster.local:26257 | v20.2.19 | 2018-11-29 16:04:36.486082+00:00 | 2018-11-29 18:24:24.587454+00:00 | true | true 2 | cockroachdb-2.cockroachdb.default.svc.cluster.local:26257 | v20.2.19 | 2018-11-29 16:55:03.880406+00:00 | 2018-11-29 18:24:23.469302+00:00 | true | true 3 | cockroachdb-1.cockroachdb.default.svc.cluster.local:26257 | v20.2.19 | 2018-11-29 16:04:41.383588+00:00 | 2018-11-29 18:24:25.030175+00:00 | true | true 4 | cockroachdb-3.cockroachdb.default.svc.cluster.local:26257 | v20.2.19 | 2018-11-29 17:31:19.990784+00:00 | 2018-11-29 18:24:26.041686+00:00 | true | true (4 rows)The pod uses the
rootclient certificate created earlier to initialize the cluster, so there's no CSR approval required.Note the ID of the node with the highest number in its address (in this case, the address including
cockroachdb-3) and use thecockroach node decommissioncommand to decommission it:Note:It's important to decommission the node with the highest number in its address because, when you reduce the replica count, Kubernetes will remove the pod for that node.
$ kubectl exec -it cockroachdb-client-secure \
-- ./cockroach node decommission <node ID> \
--certs-dir=/cockroach-certs \
--host=cockroachdb-public
You'll then see the decommissioning status print to
stderras it changes:id | is_live | replicas | is_decommissioning | is_draining +---+---------+----------+--------------------+-------------+ 4 | true | 73 | true | false (1 row)Once the node has been fully decommissioned and stopped, you'll see a confirmation:
 id | is_live | replicas | is_decommissioning | is_draining
+---+---------+----------+--------------------+-------------+
  4 |  true   |        0 |        true        |    false
(1 row)

No more data reported on target nodes. Please verify cluster health before removing the nodes.
Once the node has been decommissioned, scale down your StatefulSet:
$ kubectl scale statefulset cockroachdb --replicas=3statefulset.apps/cockroachdb scaledVerify that the pod was successfully removed:
$ kubectl get podsNAME READY STATUS RESTARTS AGE cockroachdb-0 1/1 Running 0 51m cockroachdb-1 1/1 Running 0 47m cockroachdb-2 1/1 Running 0 3m cockroachdb-client-secure 1/1 Running 0 15m ...
Get a shell into the
cockroachdb-client-securepod you created earlier and use thecockroach node statuscommand to get the internal IDs of nodes:$ kubectl exec -it cockroachdb-client-secure \ -- ./cockroach node status \ --certs-dir=/cockroach-certs \ --host=my-release-cockroachdb-publicid | address | build | started_at | updated_at | is_available | is_live +----+---------------------------------------------------------------------------------+--------+----------------------------------+----------------------------------+--------------+---------+ 1 | my-release-cockroachdb-0.my-release-cockroachdb.default.svc.cluster.local:26257 | v20.2.19 | 2018-11-29 16:04:36.486082+00:00 | 2018-11-29 18:24:24.587454+00:00 | true | true 2 | my-release-cockroachdb-2.my-release-cockroachdb.default.svc.cluster.local:26257 | v20.2.19 | 2018-11-29 16:55:03.880406+00:00 | 2018-11-29 18:24:23.469302+00:00 | true | true 3 | my-release-cockroachdb-1.my-release-cockroachdb.default.svc.cluster.local:26257 | v20.2.19 | 2018-11-29 16:04:41.383588+00:00 | 2018-11-29 18:24:25.030175+00:00 | true | true 4 | my-release-cockroachdb-3.my-release-cockroachdb.default.svc.cluster.local:26257 | v20.2.19 | 2018-11-29 17:31:19.990784+00:00 | 2018-11-29 18:24:26.041686+00:00 | true | true (4 rows)The pod uses the
rootclient certificate created earlier to initialize the cluster, so there's no CSR approval required.Note the ID of the node with the highest number in its address (in this case, the address including
cockroachdb-3) and use thecockroach node decommissioncommand to decommission it:Note:It's important to decommission the node with the highest number in its address because, when you reduce the replica count, Kubernetes will remove the pod for that node.
$ kubectl exec -it cockroachdb-client-secure \
-- ./cockroach node decommission <node ID> \
--certs-dir=/cockroach-certs \
--host=my-release-cockroachdb-public
You'll then see the decommissioning status print to
stderras it changes:id | is_live | replicas | is_decommissioning | is_draining +---+---------+----------+--------------------+-------------+ 4 | true | 73 | true | false (1 row)Once the node has been fully decommissioned and stopped, you'll see a confirmation:
 id | is_live | replicas | is_decommissioning | is_draining
+---+---------+----------+--------------------+-------------+
  4 |  true   |        0 |        true        |    false
(1 row)

No more data reported on target nodes. Please verify cluster health before removing the nodes.
Once the node has been decommissioned, scale down your StatefulSet:
$ helm upgrade \
my-release \
cockroachdb/cockroachdb \
--set statefulset.replicas=3 \
--reuse-values
Verify that the pod was successfully removed:
$ kubectl get podsNAME READY STATUS RESTARTS AGE my-release-cockroachdb-0 1/1 Running 0 51m my-release-cockroachdb-1 1/1 Running 0 47m my-release-cockroachdb-2 1/1 Running 0 3m cockroachdb-client-secure 1/1 Running 0 15m ...You should also remove the persistent volume that was mounted to the pod. Get the persistent volume claims for the volumes:
$ kubectl get pvcNAME STATUS VOLUME CAPACITY ACCESS MODES STORAGECLASS AGE datadir-my-release-cockroachdb-0 Bound pvc-75dadd4c-01a1-11ea-b065-42010a8e00cb 100Gi RWO standard 17m datadir-my-release-cockroachdb-1 Bound pvc-75e143ca-01a1-11ea-b065-42010a8e00cb 100Gi RWO standard 17m datadir-my-release-cockroachdb-2 Bound pvc-75ef409a-01a1-11ea-b065-42010a8e00cb 100Gi RWO standard 17m datadir-my-release-cockroachdb-3 Bound pvc-75e561ba-01a1-11ea-b065-42010a8e00cb 100Gi RWO standard 17mVerify that the PVC with the highest number in its name is no longer mounted to a pod:
$ kubectl describe pvc datadir-my-release-cockroachdb-3Name: datadir-my-release-cockroachdb-3 ... Mounted By: <none>Remove the persistent volume by deleting the PVC:
$ kubectl delete pvc datadir-my-release-cockroachdb-3persistentvolumeclaim "datadir-my-release-cockroachdb-3" deleted
Expand disk size
Expansion of persistent volumes with the Operator is forthcoming. See the GitHub project for progress.
You can expand certain types of persistent volumes (including GCE Persistent Disk and Amazon Elastic Block Store) by editing their persistent volume claims. Increasing disk size is often beneficial for CockroachDB performance. Read our Kubernetes performance guide for guidance on disks.
Get the persistent volume claims for the volumes:
$ kubectl get pvcNAME STATUS VOLUME CAPACITY ACCESS MODES STORAGECLASS AGE datadir-my-release-cockroachdb-0 Bound pvc-75dadd4c-01a1-11ea-b065-42010a8e00cb 100Gi RWO standard 17m datadir-my-release-cockroachdb-1 Bound pvc-75e143ca-01a1-11ea-b065-42010a8e00cb 100Gi RWO standard 17m datadir-my-release-cockroachdb-2 Bound pvc-75ef409a-01a1-11ea-b065-42010a8e00cb 100Gi RWO standard 17mNAME STATUS VOLUME CAPACITY ACCESS MODES STORAGECLASS AGE datadir-cockroachdb-0 Bound pvc-75dadd4c-01a1-11ea-b065-42010a8e00cb 100Gi RWO standard 17m datadir-cockroachdb-1 Bound pvc-75e143ca-01a1-11ea-b065-42010a8e00cb 100Gi RWO standard 17m datadir-cockroachdb-2 Bound pvc-75ef409a-01a1-11ea-b065-42010a8e00cb 100Gi RWO standard 17mIn order to expand a persistent volume claim,
AllowVolumeExpansionin its storage class must betrue. Examine the storage class:$ kubectl describe storageclass standardName: standard IsDefaultClass: Yes Annotations: storageclass.kubernetes.io/is-default-class=true Provisioner: kubernetes.io/gce-pd Parameters: type=pd-standard AllowVolumeExpansion: False MountOptions: <none> ReclaimPolicy: Delete VolumeBindingMode: Immediate Events: <none>If necessary, edit the storage class:
$ kubectl patch storageclass standard -p '{"allowVolumeExpansion": true}'storageclass.storage.k8s.io/standard patchedEdit one of the persistent volume claims to request more space:
Note:The requested
storagevalue must be larger than the previous value. You cannot use this method to decrease the disk size.$ kubectl patch pvc datadir-my-release-cockroachdb-0 -p '{"spec": {"resources": {"requests": {"storage": "200Gi"}}}}'persistentvolumeclaim/datadir-my-release-cockroachdb-0 patched$ kubectl patch pvc datadir-cockroachdb-0 -p '{"spec": {"resources": {"requests": {"storage": "200Gi"}}}}'persistentvolumeclaim/datadir-cockroachdb-0 patchedCheck the capacity of the persistent volume claim:
$ kubectl get pvc datadir-my-release-cockroachdb-0NAME STATUS VOLUME CAPACITY ACCESS MODES STORAGECLASS AGE datadir-my-release-cockroachdb-0 Bound pvc-75dadd4c-01a1-11ea-b065-42010a8e00cb 100Gi RWO standard 18m$ kubectl get pvc datadir-cockroachdb-0NAME STATUS VOLUME CAPACITY ACCESS MODES STORAGECLASS AGE datadir-cockroachdb-0 Bound pvc-75dadd4c-01a1-11ea-b065-42010a8e00cb 100Gi RWO standard 18mIf the PVC capacity has not changed, this may be because
AllowVolumeExpansionwas initially set tofalseor because the volume has a file system that has to be expanded. You will need to start or restart a pod in order to have it reflect the new capacity.Tip:Running
kubectl get pvwill display the persistent volumes with their requested capacity and not their actual capacity. This can be misleading, so it's best to usekubectl get pvc.Examine the persistent volume claim. If the volume has a file system, you will see a
FileSystemResizePendingcondition with an accompanying message:$ kubectl describe pvc datadir-my-release-cockroachdb-0$ kubectl describe pvc datadir-cockroachdb-0Waiting for user to (re-)start a pod to finish file system resize of volume on node.Delete the corresponding pod to restart it:
$ kubectl delete pod my-release-cockroachdb-0$ kubectl delete pod cockroachdb-0The
FileSystemResizePendingcondition and message will be removed.View the updated persistent volume claim:
$ kubectl get pvc datadir-my-release-cockroachdb-0NAME STATUS VOLUME CAPACITY ACCESS MODES STORAGECLASS AGE datadir-my-release-cockroachdb-0 Bound pvc-75dadd4c-01a1-11ea-b065-42010a8e00cb 200Gi RWO standard 20m$ kubectl get pvc datadir-cockroachdb-0NAME STATUS VOLUME CAPACITY ACCESS MODES STORAGECLASS AGE datadir-cockroachdb-0 Bound pvc-75dadd4c-01a1-11ea-b065-42010a8e00cb 200Gi RWO standard 20mThe CockroachDB cluster needs to be expanded one node at a time. Repeat steps 3 - 6 to increase the capacities of the remaining volumes by the same amount.
Upgrade the cluster
It is strongly recommended that you regularly upgrade your CockroachDB version in order to pick up bug fixes, performance improvements, and new features. The CockroachDB upgrade documentation describes how to perform a "rolling upgrade" of a CockroachDB cluster by stopping and restarting nodes one at a time. This is to ensure that the cluster remains available during the upgrade.
The corresponding process on Kubernetes is a staged update, in which the Docker image is updated in the CockroachDB StatefulSet and then applied to the pods one at a time.
Decide how the upgrade will be finalized.
Note:This step is relevant only when upgrading from v20.1.x to v20.2. For upgrades within the v20.2.x series, skip this step.
By default, after all nodes are running the new version, the upgrade process will be auto-finalized. This will enable certain performance improvements and bug fixes introduced in v20.2. After finalization, however, it will no longer be possible to perform a downgrade to v20.1. In the event of a catastrophic failure or corruption, the only option will be to start a new cluster using the old binary and then restore from one of the backups created prior to performing the upgrade.
We recommend disabling auto-finalization so you can monitor the stability and performance of the upgraded cluster before finalizing the upgrade:
Start the CockroachDB built-in SQL client:
$ kubectl exec -it cockroachdb-2 \
-- ./cockroach sql \
--certs-dir cockroach-certs
Set the
cluster.preserve_downgrade_optioncluster setting to the version you are upgrading from:> SET CLUSTER SETTING cluster.preserve_downgrade_option = '20.1';Exit the SQL shell and pod:
> \q
Change the desired Docker image:
Open and edit
example.yaml:$ vi example.yamlimage: name: cockroachdb/cockroach:v20.2.19Apply
example.yamlwith the new image:$ kubectl apply -f example.yamlThe Operator will perform the staged update.
If you then check the status of your cluster's pods, you should see them being restarted:
$ kubectl get podsNAME READY STATUS RESTARTS AGE cockroachdb-0 1/1 Running 0 2m cockroachdb-1 1/1 Running 0 2m cockroachdb-2 1/1 Running 0 2m cockroachdb-3 0/1 Terminating 0 1m ...This will continue until all of the pods have restarted and are running the new image. To check the image of each pod to determine whether they've all be upgraded, run:
$ kubectl get pods \
-o jsonpath='{range .items[*]}{.metadata.name}{"\t"}{.spec.containers[0].image}{"\n"}'
cockroachdb-0 cockroachdb/cockroach:v20.2.19 cockroachdb-1 cockroachdb/cockroach:v20.2.19 cockroachdb-2 cockroachdb/cockroach:v20.2.19 cockroachdb-3 cockroachdb/cockroach:v20.2.19 ...You can also check the CockroachDB version of each node in the DB Console.
Finish the upgrade.
Note:This step is relevant only when upgrading from v20.1.x to v20.2. For upgrades within the v20.2.x series, skip this step.
If you disabled auto-finalization in step 1 above, monitor the stability and performance of your cluster for as long as you require to feel comfortable with the upgrade (generally at least a day). If during this time you decide to roll back the upgrade, repeat the rolling restart procedure with the old binary.
Once you are satisfied with the new version, re-enable auto-finalization.
Start the CockroachDB built-in SQL client:
$ kubectl exec -it cockroachdb-2 \
-- ./cockroach sql \
--certs-dir cockroach-certs
Re-enable auto-finalization:
> RESET CLUSTER SETTING cluster.preserve_downgrade_option;Exit the SQL shell and pod:
> \q
Decide how the upgrade will be finalized.
Note:This step is relevant only when upgrading from v20.1.x to v20.2. For upgrades within the v20.2.x series, skip this step.
By default, after all nodes are running the new version, the upgrade process will be auto-finalized. This will enable certain performance improvements and bug fixes introduced in v20.2. After finalization, however, it will no longer be possible to perform a downgrade to v20.1. In the event of a catastrophic failure or corruption, the only option will be to start a new cluster using the old binary and then restore from one of the backups created prior to performing the upgrade.
We recommend disabling auto-finalization so you can monitor the stability and performance of the upgraded cluster before finalizing the upgrade:
Get a shell into the pod with the
cockroachbinary created earlier and start the CockroachDB built-in SQL client:$ kubectl exec -it cockroachdb-client-secure \-- ./cockroach sql \ --certs-dir=/cockroach-certs \ --host=cockroachdb-publicSet the
cluster.preserve_downgrade_optioncluster setting to the version you are upgrading from:> SET CLUSTER SETTING cluster.preserve_downgrade_option = '20.1';Exit the SQL shell and delete the temporary pod:
> \q
Add a partition to the update strategy defined in the StatefulSet. Only the pods numbered greater than or equal to the partition value will be updated. For a cluster with 3 pods (e.g.,
cockroachdb-0,cockroachdb-1,cockroachdb-2) the partition value should be 2:$ kubectl patch statefulset cockroachdb \ -p='{"spec":{"updateStrategy":{"type":"RollingUpdate","rollingUpdate":{"partition":2}}}}'statefulset.apps/cockroachdb patchedKick off the upgrade process by changing the Docker image used in the CockroachDB StatefulSet:
$ kubectl patch statefulset cockroachdb \ --type='json' \ -p='[{"op": "replace", "path": "/spec/template/spec/containers/0/image", "value":"cockroachdb/cockroach:v20.2.19"}]'statefulset.apps/cockroachdb patchedCheck the status of your cluster's pods. You should see one of them being restarted:
$ kubectl get podsNAME READY STATUS RESTARTS AGE cockroachdb-0 1/1 Running 0 2m cockroachdb-1 1/1 Running 0 2m cockroachdb-2 0/1 Terminating 0 1m ...After the pod has been restarted with the new image, get a shell into the pod and start the CockroachDB built-in SQL client:
$ kubectl exec -it cockroachdb-client-secure \-- ./cockroach sql \ --certs-dir=/cockroach-certs \ --host=cockroachdb-publicRun the following SQL query to verify that the number of underreplicated ranges is zero:
SELECT sum((metrics->>'ranges.underreplicated')::DECIMAL)::INT AS ranges_underreplicated FROM crdb_internal.kv_store_status;ranges_underreplicated -------------------------- 0 (1 row)This indicates that it is safe to proceed to the next pod.
Exit the SQL shell:
> \qDecrement the partition value by 1 to allow the next pod in the cluster to update:
$ kubectl patch statefulset cockroachdb \
-p='{"spec":{"updateStrategy":{"type":"RollingUpdate","rollingUpdate":{"partition":1}}}}'
statefulset.apps/cockroachdb patchedRepeat steps 4-8 until all pods have been restarted and are running the new image (the final partition value should be
0).Check the image of each pod to confirm that all have been upgraded:
$ kubectl get pods \
-o jsonpath='{range .items[*]}{.metadata.name}{"\t"}{.spec.containers[0].image}{"\n"}'
cockroachdb-0 cockroachdb/cockroach:v20.2.19 cockroachdb-1 cockroachdb/cockroach:v20.2.19 cockroachdb-2 cockroachdb/cockroach:v20.2.19 ...You can also check the CockroachDB version of each node in the DB Console.
Finish the upgrade.
Note:This step is relevant only when upgrading from v20.1.x to v20.2. For upgrades within the v20.2.x series, skip this step.
If you disabled auto-finalization in step 1 above, monitor the stability and performance of your cluster for as long as you require to feel comfortable with the upgrade (generally at least a day). If during this time you decide to roll back the upgrade, repeat the rolling restart procedure with the old binary.
Once you are satisfied with the new version, re-enable auto-finalization:
Get a shell into the pod with the
cockroachbinary created earlier and start the CockroachDB built-in SQL client:$ kubectl exec -it cockroachdb-client-secure \ -- ./cockroach sql \ --certs-dir=/cockroach-certs \ --host=cockroachdb-publicRe-enable auto-finalization:
> RESET CLUSTER SETTING cluster.preserve_downgrade_option;Exit the SQL shell and delete the temporary pod:
> \q
Decide how the upgrade will be finalized.
Note:This step is relevant only when upgrading from v20.1.x to v20.2. For upgrades within the v20.2.x series, skip this step.
By default, after all nodes are running the new version, the upgrade process will be auto-finalized. This will enable certain performance improvements and bug fixes introduced in v20.2. After finalization, however, it will no longer be possible to perform a downgrade to v20.1. In the event of a catastrophic failure or corruption, the only option will be to start a new cluster using the old binary and then restore from one of the backups created prior to performing the upgrade.
We recommend disabling auto-finalization so you can monitor the stability and performance of the upgraded cluster before finalizing the upgrade:
Get a shell into the pod with the
cockroachbinary created earlier and start the CockroachDB built-in SQL client:$ kubectl exec -it cockroachdb-client-secure \ -- ./cockroach sql \ --certs-dir=/cockroach-certs \ --host=my-release-cockroachdb-publicSet the
cluster.preserve_downgrade_optioncluster setting to the version you are upgrading from:> SET CLUSTER SETTING cluster.preserve_downgrade_option = '20.1';Exit the SQL shell and delete the temporary pod:
> \q
Add a partition to the update strategy defined in the StatefulSet. Only the pods numbered greater than or equal to the partition value will be updated. For a cluster with 3 pods (e.g.,
cockroachdb-0,cockroachdb-1,cockroachdb-2) the partition value should be 2:$ helm upgrade \ my-release \ cockroachdb/cockroachdb \ --set statefulset.updateStrategy.rollingUpdate.partition=2Kick off the upgrade process by changing the Docker image used in the CockroachDB StatefulSet:
Note:For Helm, you must remove the cluster initialization job from when the cluster was created before the cluster version can be changed.
$ kubectl delete job my-release-cockroachdb-init$ helm upgrade \ my-release \ cockroachdb/cockroachdb \ --set image.tag=v20.2.19 \ --reuse-valuesCheck the status of your cluster's pods. You should see one of them being restarted:
$ kubectl get podsNAME READY STATUS RESTARTS AGE my-release-cockroachdb-0 1/1 Running 0 2m my-release-cockroachdb-1 1/1 Running 0 3m my-release-cockroachdb-2 0/1 ContainerCreating 0 25s my-release-cockroachdb-init-nwjkh 0/1 ContainerCreating 0 6s ...Note:Ignore the pod for cluster initialization. It is re-created as a byproduct of the StatefulSet configuration but does not impact your existing cluster.
After the pod has been restarted with the new image, get a shell into the pod and start the CockroachDB built-in SQL client:
$ kubectl exec -it cockroachdb-client-secure \ -- ./cockroach sql \ --certs-dir=/cockroach-certs \ --host=my-release-cockroachdb-publicRun the following SQL query to verify that the number of underreplicated ranges is zero:
SELECT sum((metrics->>'ranges.underreplicated')::DECIMAL)::INT AS ranges_underreplicated FROM crdb_internal.kv_store_status;ranges_underreplicated -------------------------- 0 (1 row)This indicates that it is safe to proceed to the next pod.
Exit the SQL shell:
> \qDecrement the partition value by 1 to allow the next pod in the cluster to update:
$ helm upgrade \
my-release \
cockroachdb/cockroachdb \
--set statefulset.updateStrategy.rollingUpdate.partition=1 \
Repeat steps 4-8 until all pods have been restarted and are running the new image (the final partition value should be
0).Check the image of each pod to confirm that all have been upgraded:
$ kubectl get pods \
-o jsonpath='{range .items[*]}{.metadata.name}{"\t"}{.spec.containers[0].image}{"\n"}'
my-release-cockroachdb-0 cockroachdb/cockroach:v20.2.19 my-release-cockroachdb-1 cockroachdb/cockroach:v20.2.19 my-release-cockroachdb-2 cockroachdb/cockroach:v20.2.19 ...You can also check the CockroachDB version of each node in the DB Console.
Finish the upgrade.
Note:This step is relevant only when upgrading from v20.1.x to v20.2. For upgrades within the v20.2.x series, skip this step.
If you disabled auto-finalization in step 1 above, monitor the stability and performance of your cluster for as long as you require to feel comfortable with the upgrade (generally at least a day). If during this time you decide to roll back the upgrade, repeat the rolling restart procedure with the old binary.
Once you are satisfied with the new version, re-enable auto-finalization:
Get a shell into the pod with the
cockroachbinary created earlier and start the CockroachDB built-in SQL client:$ kubectl exec -it cockroachdb-client-secure \ -- ./cockroach sql \ --certs-dir=/cockroach-certs \ --host=my-release-cockroachdb-publicRe-enable auto-finalization:
> RESET CLUSTER SETTING cluster.preserve_downgrade_option;Exit the SQL shell and delete the temporary pod:
> \q
Stop the cluster
To shut down the CockroachDB cluster:
Delete the previously created custom resource:
$ kubectl delete -f example.yamlRemove the Operator:
$ kubectl delete -f https://raw.githubusercontent.com/cockroachdb/cockroach-operator/v2.18.2/install/operator.yamlThis will delete the StatefulSet but will not delete the persistent volumes that were attached to the pods.
Warning:If you want to delete the persistent volumes and free up the storage used by CockroachDB, be sure you have a backup copy of your data. Data cannot be recovered once the persistent volumes are deleted. For more information, see the Kubernetes documentation.
This does not delete the secrets you created. For more information on managing secrets, see the Kubernetes documentation.
Delete the resources associated with the
cockroachdblabel, including the logs and Prometheus and Alertmanager resources:Warning:This does not include deleting the persistent volumes that were attached to the pods. If you want to delete the persistent volumes and free up the storage used by CockroachDB, be sure you have a backup copy of your data. Data cannot be recovered once the persistent volumes are deleted. For more information, see the Kubernetes documentation.
$ kubectl delete pods,statefulsets,services,poddisruptionbudget,jobs,rolebinding,clusterrolebinding,role,clusterrole,serviceaccount,alertmanager,prometheus,prometheusrule,serviceMonitor -l app=cockroachdbpod "cockroachdb-0" deleted pod "cockroachdb-1" deleted pod "cockroachdb-2" deleted statefulset.apps "alertmanager-cockroachdb" deleted statefulset.apps "prometheus-cockroachdb" deleted service "alertmanager-cockroachdb" deleted service "cockroachdb" deleted service "cockroachdb-public" deleted poddisruptionbudget.policy "cockroachdb-budget" deleted job.batch "cluster-init-secure" deleted rolebinding.rbac.authorization.k8s.io "cockroachdb" deleted clusterrolebinding.rbac.authorization.k8s.io "cockroachdb" deleted clusterrolebinding.rbac.authorization.k8s.io "prometheus" deleted role.rbac.authorization.k8s.io "cockroachdb" deleted clusterrole.rbac.authorization.k8s.io "cockroachdb" deleted clusterrole.rbac.authorization.k8s.io "prometheus" deleted serviceaccount "cockroachdb" deleted serviceaccount "prometheus" deleted alertmanager.monitoring.coreos.com "cockroachdb" deleted prometheus.monitoring.coreos.com "cockroachdb" deleted prometheusrule.monitoring.coreos.com "prometheus-cockroachdb-rules" deleted servicemonitor.monitoring.coreos.com "cockroachdb" deletedDelete the pod created for
cockroachclient commands, if you didn't do so earlier:$ kubectl delete pod cockroachdb-client-securepod "cockroachdb-client-secure" deleted
This does not delete the secrets you created. For more information on managing secrets, see the Kubernetes documentation.
Uninstall the release:
$ helm uninstall my-releaserelease "my-release" deletedDelete the pod created for
cockroachclient commands, if you didn't do so earlier:$ kubectl delete pod cockroachdb-client-securepod "cockroachdb-client-secure" deletedGet the names of any CSRs for the cluster:
$ kubectl get csrNAME AGE REQUESTOR CONDITION default.client.root 1h system:serviceaccount:default:default Approved,Issued default.node.my-release-cockroachdb-0 1h system:serviceaccount:default:default Approved,Issued default.node.my-release-cockroachdb-1 1h system:serviceaccount:default:default Approved,Issued default.node.my-release-cockroachdb-2 1h system:serviceaccount:default:default Approved,Issued default.node.my-release-cockroachdb-3 12m system:serviceaccount:default:default Approved,Issued node-csr-0Xmb4UTVAWMEnUeGbW4KX1oL4XV_LADpkwjrPtQjlZ4 1h kubelet Approved,Issued node-csr-NiN8oDsLhxn0uwLTWa0RWpMUgJYnwcFxB984mwjjYsY 1h kubelet Approved,Issued node-csr-aU78SxyU69pDK57aj6txnevr7X-8M3XgX9mTK0Hso6o 1h kubelet Approved,Issued ...Delete any CSRs that you created:
$ kubectl delete csr default.client.root default.node.my-release-cockroachdb-0 default.node.my-release-cockroachdb-1 default.node.my-release-cockroachdb-2 default.node.my-release-cockroachdb-3certificatesigningrequest "default.client.root" deleted certificatesigningrequest "default.node.my-release-cockroachdb-0" deleted certificatesigningrequest "default.node.my-release-cockroachdb-1" deleted certificatesigningrequest "default.node.my-release-cockroachdb-2" deleted certificatesigningrequest "default.node.my-release-cockroachdb-3" deletedNote:This does not delete the secrets you created. For more information on managing secrets, see the Kubernetes documentation.
Stop Kubernetes
To delete the Kubernetes cluster:
Hosted GKE:
$ gcloud container clusters delete cockroachdb --region {region-name}Hosted EKS:
$ eksctl delete cluster --name cockroachdb
If you stop Kubernetes without first deleting the persistent volumes, they will still exist in your cloud project.
